Thursday, March 20, 2014

Normalize file names to conform android's convertions

Hi there!

Today i'm gonna show how to normalize resource file names coming from your designers saving you a lot of time while renaming it. It is more like an util class. It may help you like it helped me. NOTE: I'm using the apache-common-io lib for that.

import java.io.File;
import java.io.FilenameFilter;
import java.io.IOException;

import org.apache.commons.io.FileUtils;
/**
 * Normalizes incorrect file names to conform android's conventions.
 * @author Ricardo Ferreira
 * @version 1.0
 * @since 20/03/2014
 */
public class FileNameNormalizer {

   
    /**
     * Normalizes incorrect file names like "hello kit", "bruno & Mars" or "what-is-that" into "hello_kit", 
     * "bruno_Mars" and "what_is_that". Here an example on how to use it:
     * 

     *  String dir1 = "D:/dir1/";
     *  String dir2 = "D:/dir2/";
     *  String[] fromDirectories = new String[]{dir1,dir2};
     *  String[] withExtensions = new String[]{"gif", "png", "bmp" };
     *  String toDestination = "D:/destination/";
     *  String[] regularExpression =  new String[]{" & "," ","-" };
     *  normalize(fromDirectories, withExtensions, toDestination,regularExpression);
     * 
* @param fromDirectories * @param withExtensions * @param toDestination * @param regularExpression */ public void normalize(String[] fromDirectories, final String[] withExtensions, final String toDestination,String[] regularExpression){//NOPMD for (String fromDirectory : fromDirectories) { normalize(fromDirectory, withExtensions, toDestination,regularExpression); } } private void normalize(String fromDirectory, final String[] withExtensions, final String toDestination, String[] regularExpression){//NOPMD fromDirectory=ensureCorrectDirectory(fromDirectory); String destination = ensureCorrectDirectory(toDestination); File dir = new File(fromDirectory); FilenameFilter filenameFilter = new FilenameFilter() { @Override public boolean accept(final File dir, final String name) { for (final String ext : withExtensions) { if (name.endsWith("." + ext)) { return (true); } } return (false); } }; if (dir.isDirectory()) { for (final File f : dir.listFiles(filenameFilter)) { normalizeAndMoveTo(f.getAbsolutePath(), destination,regularExpression); } } } private String ensureCorrectDirectory(String dir){ if(!dir.endsWith("/")){ dir+="/"; } return dir; } private void normalizeAndMoveTo(String toNomalize, String destination, String[] regularExpression){ File oldFile = new File(toNomalize); File temp = new File(normalizePng(toNomalize,regularExpression)); String newFilePath = destination + temp.getName(); File newFile = new File(newFilePath); try { FileUtils.moveFile(oldFile, newFile); } catch (IOException e) { e.printStackTrace(); } } private String normalizePng(String toNormalize, String[] regularExpression){ String replacement = "_"; String newname = toNormalize; for (String regex : regularExpression) { newname = newname.replaceAll(regex, replacement); } return newname; } }

😱👇 PROMOTIONAL DISCOUNT: BOOKS AND IPODS PRO ðŸ˜±ðŸ‘‡

Be sure to read, it will change your life!
Show your work by Austin Kleonhttps://amzn.to/34NVmwx

This book is a must read - it will put you in another level! (Expert)
Agile Software Development, Principles, Patterns, and Practiceshttps://amzn.to/30WQSm2

Write cleaner code and stand out!
Clean Code - A Handbook of Agile Software Craftsmanship: https://amzn.to/33RvaSv

This book is very practical, straightforward and to the point! Worth every penny!
Kotlin for Android App Development (Developer's Library): https://amzn.to/33VZ6gp

Needless to say, these are top right?
Apple AirPods Pro: https://amzn.to/2GOICxy

😱👆 PROMOTIONAL DISCOUNT: BOOKS AND IPODS PRO ðŸ˜±ðŸ‘†

Monday, February 24, 2014

MVC applied on Android - A practical approach

Hi there!

Today i'm gonna show, how i apply the MVC pattern while developing android applications. I found it so usefull and it separates the concerns in such a nice way, that i think it could be also helpful for others out there.

Some people don't know why we should do that or what is the advantage of it exactly. So before you ask me that ;) here is the explanation of Martin Follower, which a share:

Definition of MVC

"At the heart of MVC is what I call Separated Presentation. The idea behind Separated Presentation is to make a clear division between domain objects that model our perception of the real world, and presentation objects that are the GUI elements we see on the screen. Domain objects should be completely self contained and work without reference to the presentation, they should also be able to support multiple presentations, possibly simultaneously. The fully article can be read here."

And that is exactly what i'm trying to show bellow. A way to decouple View from Model. So in this approach bellow, my View is designed entirely without any logic and don't care about the Model. The model istself contains alls business logics but don't know the View. The Controller is the mediator and is the only one who knows both Model and View. But it does not implement UI or Business Logic. Instead of that, it delegates (mediates) to its delegatees.


Class diagram

To show how it could looks like, i've created a simple calculator project. Lets take a look at the UML and Sequence-diagram first:


Sequence diagram

Und here the sequence diagram:


In the sequence diagram above, the activity representes the HI (Human Interface - Hardware), the View represents the GUI (Grafical User Interface), the Model is responsible for all business logics, the Controller is the mediator and the Calculator, Reseter, DbUpdater and ViewUpdater are the Delegatees from the Controller. They may have access to Model, to View or to both of them.


Creating the project

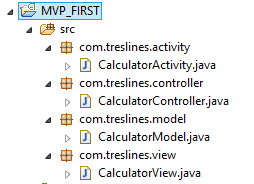
Create a simple blank project and define the structure like this:

Here you can already see the first advantage of it. We have separeted packages and a clear structure of our architecture already. It makes a lot easier to explain things especially if you are working with distributed teams. For each activity you will have a group of 3 elementes. (MVC)


Creating the Model

The model contains just business logics. In our case a simple calculation. Which can be tested separeted thru junit tests for example. It is not allowed to have any reference to our View. Our example looks like this:


// MODEL'S RESPONSABILITY: 
//
// ACCESS DB USING DAO's AND COMPUTE BUSINESS LOGICS ONLY. IT COMMUNICATES ONLY
// WITH THE CONTROLLER.
//
// IMPORTANT: IT DOESN'T CARE ABOUT VIEW AND IT DOESN'T KNOW NOTHING ABOUT THE VIEW
public class CalculatorModel implements Serializable {

    private static final long serialVersionUID = 1L;
    
    // YOU MAY STORE THING IN THE DB AND QUERY FOR INFORMATION
    // IN THIS SIMPLE EXAMPLE WE JUST HAVE A SIMPLE CALCULATOR MODEL
    private int lastResult;
    private int actualResult;

    public void add2Numbers(int firstNumber, int secondNumber) {
        this.lastResult = firstNumber + secondNumber;
        this.actualResult = this.lastResult;
    }

    public int getActualResult() {
        return actualResult;
    }

    public int getLastResult() {
        return lastResult;
    }

    public void resetActualResult() {
        this.actualResult = 0;
    }

}


Creating the totally dummy View

The view is totally dumm and has no logic inside of it. It contains just the UI objects that will be shown to the user later. Something like this:


define a layout like this for it:
< relativelayout android:layout_height="match_parent" android:layout_width="match_parent" android:paddingbottom="@dimen/activity_vertical_margin" android:paddingleft="@dimen/activity_horizontal_margin" android:paddingright="@dimen/activity_horizontal_margin" android:paddingtop="@dimen/activity_vertical_margin" tools:context=".CalculatorActivity" xmlns:android="http://schemas.android.com/apk/res/android" xmlns:tools="http://schemas.android.com/tools">

    < textview android:id="@+id/textView1" android:layout_height="wrap_content" android:layout_width="wrap_content" android:text="Calulator">

    < edittext android:ems="10" android:id="@+id/firstNumberField" android:layout_alignleft="@+id/textView1" android:layout_alignparentright="true" android:layout_below="@+id/textView1" android:layout_height="wrap_content" android:layout_margintop="16dp" android:layout_width="wrap_content"/ >

    < edittext android:ems="10" android:id="@+id/secondNumberField" android:layout_alignleft="@+id/firstNumberField" android:layout_alignright="@+id/firstNumberField" android:layout_below="@+id/firstNumberField" android:layout_height="wrap_content" android:layout_margintop="18dp" android:layout_width="wrap_content" / >

    < button android:id="@+id/calculateButton" android:layout_alignleft="@+id/secondNumberField" android:layout_below="@+id/secondNumberField" android:layout_height="wrap_content" android:layout_margintop="24dp" android:layout_width="wrap_content" android:text="calculate"/ >

    < textview android:id="@+id/calculationResult" android:layout_alignleft="@+id/calculateButton" android:layout_alignright="@+id/calculateButton" android:layout_below="@+id/calculateButton" android:layout_height="wrap_content" android:layout_margintop="28dp" android:layout_width="wrap_content" android:text="Result" android:textappearance="?android:attr/textAppearanceLarge"/ >

    < textview android:id="@+id/lastCalculationResult" android:layout_alignbottom="@+id/textView1" android:layout_alignright="@+id/firstNumberField" android:layout_height="wrap_content" android:layout_marginleft="37dp" android:layout_torightof="@+id/textView1" android:layout_width="wrap_content" android:text="Last Calculation Result"/ >

    < /textview>< /textview>< /button>< button android:id="@+id/resetButton" android:layout_alignbottom="@+id/calculateButton" android:layout_alignright="@+id/secondNumberField" android:layout_height="wrap_content" android:layout_width="wrap_content" android:text="Reset"/ >

< /relativelayout>

Then create a class in the view package like this:
// VIEW'S RESPONSABILITY: 
//
// INSTANTIATE ALL COMPONENTS AND BIND IT TO THE CONTROLLER. IT COMMUNICATES ONLY WITH
// THE CONTROLLER.
//
// IMPORTANT: IT DOESN'T CARE ABOUT MODEL AND IT DOESN'T KNOW NOTHING ABOUT THE MODEL
public class CalculatorView {
    
    private EditText firstNumberField;
    private EditText secondNumberField;
    private TextView lastCalculationResult;
    private TextView calculationResult;
    private Button calculateButton;
    private Button resetButton;
    protected Activity context;

    public CalculatorView(Activity context) {
        this.context = context;
        defineViewOrientation();
        firstNumberField = (EditText) context.findViewById(R.id.firstNumberField);
        secondNumberField = (EditText) context.findViewById(R.id.secondNumberField);
        calculationResult = (TextView) context.findViewById(R.id.calculationResult);
        lastCalculationResult = (TextView) context.findViewById(R.id.lastCalculationResult);
        calculateButton = (Button) context.findViewById(R.id.calculateButton);
        resetButton = (Button) context.findViewById(R.id.resetButton);
    }
    
    private void defineViewOrientation(){
        context.setRequestedOrientation(ActivityInfo.SCREEN_ORIENTATION_PORTRAIT);
    }

    public void bind(CalculatorController listener) {
        calculateButton.setOnClickListener(listener);
        resetButton.setOnClickListener(listener);
    }
    
    public EditText getFirstNumberField() {
        return firstNumberField;
    }

    public EditText getSecondNumberField() {
        return secondNumberField;
    }

    public TextView getLastCalculationResult() {
        return lastCalculationResult;
    }

    public TextView getCalculationResult() {
        return calculationResult;
    }

}

Creating the Controller

To complete the MVC, define a controller which knows about both model and view. 

// CONTROLLER'S RESPONSABILITY: 
//
// MEDIATE USER'S ACTIONS BETWEEN MODEL AND VIEW. INTERACTS AS A DELEGATOR. 
//
// THIS IS THE CENTRAL PLACE TO LOOK FOR BEHAVIORS. EVERYTHING HAPPENS HERE...
public class CalculatorController extends Observable implements OnClickListener {

    private CalculatorModel model;
    private CalculatorView view;

    public CalculatorController(CalculatorModel model, CalculatorView view) {
        super();
        setModel(model);
        setView(view);
        bindControllerOnView();
        addObservers();
    }
    
    public void addObservers() {
        addObserver(new Calculator());
        addObserver(new Reseter());
    }
    
    private class Calculator implements Observer {
        @Override
        public void update(Observable observable, Object object) {
            if (R.id.calculateButton == ((View) object).getId()) {
                String first = getView().getFirstNumberField().getText().toString();
                String second = getView().getSecondNumberField().getText().toString();
                int firstNumber = Integer.valueOf(first);
                int secondNumber = Integer.valueOf(second);
                getModel().add2Numbers(firstNumber, secondNumber);
                int result = getModel().getActualResult();
                getView().getCalculationResult().setText(String.valueOf(result));
                getView().getLastCalculationResult().setText("Last Result: " + result);
            }
        }
    }

    private class Reseter implements Observer {
        @Override
        public void update(Observable observable, Object object) {
            if (R.id.resetButton == ((View) object).getId()) {
                getView().getCalculationResult().setText(String.valueOf(0));
                getView().getFirstNumberField().setText("");
                getView().getSecondNumberField().setText("");
            }
        }
    }

    @Override
    public void onClick(View view) {
        this.setChanged();
        this.notifyObservers(view);
    }

    public void setView(CalculatorView view) {this.view = view;}
    public CalculatorView getView() {return view;}
    public void setModel(CalculatorModel model) {this.model = model;}
    public CalculatorModel getModel() {return model;}
    public void bindControllerOnView(){getView().bind(this);}

    public void updateView() {/*Auto-generated method stub*/}
    public void updateDb() {/*Auto-generated method stub*/}

}

Using it in the CalculatorActivity

Finally call it in the activity. Take your time to understand it and see how small and understandable the class are. This approach also leads to SRP (single responsibility principle) which is desired and much better then having all havy weight code in one single class. 

The Usage

The final code looks like this:
 
// WHY WE DO THAT? BECAUSE CLEAN CODE MATTERS!!! ;)
//
// IMAGINE THIS CLASS AS THE CLIENT (THE MAIN CLASS)
// EACH ACTIVITY IS REPRESENTED BY A GROUP OF MVC'S
//
// IMPORTANT: USES THE CONTROLLER TO DELEGATE EVERYTHING. 
// IT DOESN'T CARE ABOUT THE IMPLEMENTATION.
//
public class CalculatorActivity extends Activity {
    
    protected CalculatorController controller;
    @Override
    protected void onCreate(Bundle savedInstanceState) {
        super.onCreate(savedInstanceState);
        setContentView(R.layout.activity_main);
        
        // MVC - APPLIED IN THE PRACTISE
        controller = new CalculatorController(new CalculatorModel(), new CalculatorView(this));
    }
    
    @Override
    protected void onActivityResult(int requestCode, int resultCode, Intent data) {
        // THIS IS JUST AN EXAMPLE, BUT YOU MAY DELEGATE THINGS ON:
        // onPause(), onResume(), onWhatEverYouNeed() ...
        //
        controller.updateView();
        controller.updateDb();
    }
}

Conclusions 

I found this way so nice and so clear, that i'm using it in my projects with a lot of possitive feedbacks. Maintenance has become a lot more easier and adding new features has also become a lot more clear and faster. Of course thats not the final approach. I did it that way here to make it simple and to show the idea and advantages behind it. In the final approach i have a defined a abstract model like this: public abstract class MvcModel implements Serializable..., an abstract generic Controller public abstract class MvcController< V extends MvcView, M extends MvcModel > extends Observable implements OnClickListener..., and an abstract view public abstract class MvcView.... Each of them contains a lot of utilities in it, making it simplier to me to implent my projects. So it is up to you to improve it and make it reusable for you. In fact i have created a lib project which i've placed all of those concepts i use.

Thats all. Hope you like it.

😱👇 PROMOTIONAL DISCOUNT: BOOKS AND IPODS PRO ðŸ˜±ðŸ‘‡

Be sure to read, it will change your life!
Show your work by Austin Kleonhttps://amzn.to/34NVmwx

This book is a must read - it will put you in another level! (Expert)
Agile Software Development, Principles, Patterns, and Practiceshttps://amzn.to/30WQSm2

Write cleaner code and stand out!
Clean Code - A Handbook of Agile Software Craftsmanship: https://amzn.to/33RvaSv

This book is very practical, straightforward and to the point! Worth every penny!
Kotlin for Android App Development (Developer's Library): https://amzn.to/33VZ6gp

Needless to say, these are top right?
Apple AirPods Pro: https://amzn.to/2GOICxy

😱👆 PROMOTIONAL DISCOUNT: BOOKS AND IPODS PRO ðŸ˜±ðŸ‘†

Friday, December 20, 2013

Generics vs. AndroidAnnotations Android

Hi there!

In the last post i've shown the advantages of AndroidAnnotations against the tratidional instantiation way from Androd using castings while using the method findById(). AndroidAnnotatations are fine, but if for some reason (additional depencency, License or somethign else) you can't use it, there is an alternative to it. Generics solves this problem in my opinion also very elegant.

Pre-Conditions

Do the steps of post AndroidAnnotations and come back to this post when you are done.

BaseActivity with generics

Create the following class in your sample project (Attention: for some reason i don't know, while inserting code snippets here, generic types are not displayed correctly. For this reason i copied the generics like a String "T extends View". Please remove the Strings from it after copying):

import android.app.Activity;
import android.view.MotionEvent;
import android.view.View;
import android.view.View.OnClickListener;
import android.view.View.OnLongClickListener;
import android.view.View.OnTouchListener;

@SuppressWarnings("unchecked")
public class BaseActivity extends Activity {

    /**
     * Convenience method. Does exactly the same as {@link BaseActivity#initById(Class, int)}
     * @param safetyCheck the class type to be returned
     * @param id the defined R.id... in the layout xml file
     * @return a reference of the specified class type.
     */
    public <"T extends View"> T getReferenceById(Class safetyCheck, final int id) {
        return initById(safetyCheck, id);
    }

    /**
     * Initializes views over id's.
     * @param safetyCheck the class type to be returned
     * @param id the defined R.id... in the layout xml file
     * @return a reference of the specified class type.
     */
    public <"T extends View"> T initById(Class safetyCheck, final int id) {
        return (T) findViewById(id);
    }

    /**
     * Initializes views over id's with onClickListeners.
     * @param id the defined R.id... in the layout xml file
     * @param callback a concrete implementation of {@link OnClickCallback}
     * @return a reference of the specified class type in {@link OnClickCallback}.
     */
    public <"T extends View"> T initWithListener(final int id, final OnClickCallback callback) {
        T type = (T) findViewById(id);
        type.setOnClickListener(new OnClickListener() {
            @Override
            public void onClick(View view) {
                callback.onClickPerformed((T) view);
            }
        });
        return type;
    }

    /**
     * Initializes views over id's with onTouchListeners.
     * @param id the defined R.id... in the layout xml file
     * @param callback a concrete implementation of {@link OnTouchCallback}
     * @return a reference of the specified class type in {@link OnTouchCallback}.
     */
    public <"T extends View"> T initWithListener(final int id, final OnTouchCallback callback) {
        T type = (T) findViewById(id);
        type.setOnTouchListener(new OnTouchListener() {
            @Override
            public boolean onTouch(View view, MotionEvent event) {
                return callback.onTouchPerfomed((T) view, event);
            }

        });
        return type;
    }

    /**
     * Initializes views over id's with onLongClickListeners.
     * @param id the defined R.id... in the layout xml file
     * @param callback a concrete implementation of {@link OnLongClickCallback}
     * @return a reference of the specified class type in {@link OnLongClickCallback}.
     */
    public <"T extends View"> T initWithListener(final int id, final OnLongClickCallback callback) {
        T type = (T) findViewById(id);
        type.setOnLongClickListener(new OnLongClickListener() {
            @Override
            public boolean onLongClick(View view) {
                return callback.onLongClickPerformed((T) view);
            }
        });
        return type;
    }

    /**
     * Implement this interface and add an instance of it to the method
     * {@link BaseActivity#initWithListener(int, Callback)} while initializing your components
     * (Views)
     * @author Ricardo Ferreira
     * @since 20/12/2013
     * @version 1.0
     */
    public interface OnClickCallback<"T extends View"> {
        void onClickPerformed(T view);
    }
    /**
     * Implement this interface and add an instance of it to the method
     * {@link BaseActivity#initWithListener(int, Callback)} while initializing your components
     * (Views)
     * @author Ricardo Ferreira
     * @since 20/12/2013
     * @version 1.0
     */
    public interface OnLongClickCallback<"T extends View"> {
        boolean onLongClickPerformed(T view);
    }
    /**
     * Implement this interface and add an instance of it to the method
     * {@link BaseActivity#initWithListener(int, Callback)} while initializing your components
     * (Views)
     * @author Ricardo Ferreira
     * @since 20/12/2013
     * @version 1.0
     */
    public interface OnTouchCallback<"T extends View"> {
        boolean onTouchPerfomed(T view, MotionEvent event);
    }

}


Modify your MainActivity

Copy paste the next code segment into your MainActiviy. (Attention: for some reason i don't know, while inserting code snippets here, generic types are not displayed correctly. For this reason i copied the generics like a String "T extends View". Please remove the Strings from it after copying):

import android.os.Bundle;
import android.widget.Button;
import android.widget.TextView;
import android.widget.Toast;

public class MainActivity extends BaseActivity {

    private OnClickCallback<"Button"> btnClickCallback = new ButtonClickCallback();

    @Override
    protected void onCreate(Bundle savedInstanceState) {
        super.onCreate(savedInstanceState);
        setContentView(R.layout.activity_main);

        initById(TextView.class, R.id.textView1);
        initWithListener(R.id.button1, btnClickCallback);
        initWithListener(R.id.button2, btnClickCallback);
        initWithListener(R.id.button3, btnClickCallback);
        initWithListener(R.id.button4, btnClickCallback);
        initWithListener(R.id.button5, btnClickCallback);
        initWithListener(R.id.button6, btnClickCallback);
        initWithListener(R.id.button7, btnClickCallback);
        initWithListener(R.id.button8, btnClickCallback);
        initWithListener(R.id.button9, btnClickCallback);
        initWithListener(R.id.button10, btnClickCallback);
        initWithListener(R.id.button11, btnClickCallback);
        initWithListener(R.id.button12, btnClickCallback);
        initWithListener(R.id.button13, btnClickCallback);
        initWithListener(R.id.button14, btnClickCallback);
        initWithListener(R.id.button15, btnClickCallback);

    }

    private class ButtonClickCallback implements OnClickCallback<"Button"> {
        @Override
        public void onClickPerformed(Button type) {
            switch (type.getId()) {
            case R.id.button1:
                // returns a Button... do something useful with... if you need to...
                getReferenceById(Button.class, R.id.button1); 
                handleClick();
                break;
            case R.id.textView1:
                // returns a TextView... do something useful with... if you need to...
                getReferenceById(TextView.class, R.id.textView1); 
                handleClick();
                break;
            default:
                handleClick();
                break;
            }
        }
    }

    private void handleClick() {
        Toast.makeText(this, "Generics are even cooler!", Toast.LENGTH_SHORT).show();
    }

}


That's all. Hope you like it.

😱👇 PROMOTIONAL DISCOUNT: BOOKS AND IPODS PRO ðŸ˜±ðŸ‘‡

Be sure to read, it will change your life!
Show your work by Austin Kleonhttps://amzn.to/34NVmwx

This book is a must read - it will put you in another level! (Expert)
Agile Software Development, Principles, Patterns, and Practiceshttps://amzn.to/30WQSm2

Write cleaner code and stand out!
Clean Code - A Handbook of Agile Software Craftsmanship: https://amzn.to/33RvaSv

This book is very practical, straightforward and to the point! Worth every penny!
Kotlin for Android App Development (Developer's Library): https://amzn.to/33VZ6gp

Needless to say, these are top right?
Apple AirPods Pro: https://amzn.to/2GOICxy

😱👆 PROMOTIONAL DISCOUNT: BOOKS AND IPODS PRO ðŸ˜±ðŸ‘†

Wednesday, December 18, 2013

Write less code with AndroidAnnotations and increase maintainability and readability

Hi there!

Today i'm gonna show how to write less code but simultaneously improve maintainability and readability of your android code. I was so impressed that I wanted to try myself, how good and how easy it really is. In this tuturial i will only show the benefits of AndroidAnnotations and not how to install it. But don't worry. If you decide to use it (and i'm sure you'll will :) there is no magic on how to install it. In this site you'll get all the information you need: AndroidAnnotations

The sample project

We will endup with something like this bellow to show to you the power and simplicity of AndroidAnnotatios. 


MainActivity

Create a simple project and dont change the default names while creating the project. In the folder res>layout>activity_main.xml copy/paste the following code snippet inside of it.


Initializing the components 

If you initialize the components in the tradional android way, you would end up with a class like this:

package com.treslines.androidannotations;

import android.app.Activity;
import android.os.Bundle;
import android.view.Menu;
import android.view.View;
import android.view.View.OnClickListener;
import android.widget.Button;
import android.widget.TextView;
import android.widget.Toast;

public class MainActivity extends Activity implements OnClickListener {

    private TextView title;
    private Button button1;
    private Button button2;
    private Button button3;
    private Button button4;
    private Button button5;
    private Button button6;
    private Button button7;
    private Button button8;
    private Button button9;
    private Button button10;
    private Button button11;
    private Button button12;
    private Button button13;
    private Button button14;
    private Button button15;

    @Override
    protected void onCreate(Bundle savedInstanceState) {
        super.onCreate(savedInstanceState);
        setContentView(R.layout.activity_main);

        title = (TextView) findViewById(R.id.textView1);
        button1 = (Button) findViewById(R.id.button1);
        button2 = (Button) findViewById(R.id.button2);
        button3 = (Button) findViewById(R.id.button3);
        button4 = (Button) findViewById(R.id.button4);
        button5 = (Button) findViewById(R.id.button5);
        button6 = (Button) findViewById(R.id.button6);
        button7 = (Button) findViewById(R.id.button7);
        button8 = (Button) findViewById(R.id.button8);
        button9 = (Button) findViewById(R.id.button9);
        button10 = (Button) findViewById(R.id.button10);
        button11 = (Button) findViewById(R.id.button11);
        button12 = (Button) findViewById(R.id.button12);
        button13 = (Button) findViewById(R.id.button13);
        button14 = (Button) findViewById(R.id.button14);
        button15 = (Button) findViewById(R.id.button15);
        
        button1.setOnClickListener(this);
        button2.setOnClickListener(this);
        button3.setOnClickListener(this);
        button4.setOnClickListener(this);
        button5.setOnClickListener(this);
        button6.setOnClickListener(this);
        button7.setOnClickListener(this);
        button8.setOnClickListener(this);
        button9.setOnClickListener(this);
        button10.setOnClickListener(this);
        button11.setOnClickListener(this);
        button12.setOnClickListener(this);
        button13.setOnClickListener(this);
        button14.setOnClickListener(this);
        button15.setOnClickListener(this);

    }

    @Override
    public void onClick(View view) {
        final int id = view.getId();
        switch (id) {

        case R.id.button1:
            handleClick();
            break;
        case R.id.button2:
            handleClick();
            break;
        case R.id.button3:
            handleClick();
            break;
        case R.id.button4:
            handleClick();
            break;
        case R.id.button5:
            handleClick();
            break;
        case R.id.button6:
            handleClick();
            break;
        case R.id.button7:
            handleClick();
            break;
        case R.id.button8:
            handleClick();
            break;
        case R.id.button9:
            handleClick();
            break;
        case R.id.button10:
            handleClick();
            break;
        case R.id.button11:
            handleClick();
            break;
        case R.id.button12:
            handleClick();
            break;
        case R.id.button13:
            handleClick();
            break;
        case R.id.button14:
            handleClick();
            break;
        case R.id.button15:
            handleClick();
            break;

        default:
            break;
        }

    }
    
    private void handleClick(){
        Toast.makeText(this, "AndroidAnnotations are cool!", Toast.LENGTH_SHORT).show();
    }

    @Override
    public boolean onCreateOptionsMenu(Menu menu) {
        // Inflate the menu; this adds items to the action bar if it is present.
        getMenuInflater().inflate(R.menu.main, menu);
        return true;
    }
}


The benefits of AndroidAnnotations

If you do the same thing with AndroidAnnotations we endup with something soooooo coooool like this ;)


package com.treslines.withandroidannotations;

import android.app.Activity;
import android.os.Bundle;
import android.view.Menu;
import android.widget.Button;
import android.widget.TextView;
import android.widget.Toast;

import com.googlecode.androidannotations.annotations.Click;
import com.googlecode.androidannotations.annotations.EActivity;
import com.googlecode.androidannotations.annotations.ViewById;

@EActivity(R.layout.activity_main)
public class MainActivity extends Activity {

    @ViewById(R.id.textView1) protected TextView title;
    @ViewById(R.id.button1) protected Button button1;
    @ViewById(R.id.button2) protected Button button2;
    @ViewById(R.id.button3) protected Button button3;
    @ViewById(R.id.button4) protected Button button4;
    @ViewById(R.id.button5) protected Button button5;
    @ViewById(R.id.button6) protected Button button6;
    @ViewById(R.id.button7) protected Button button7;
    @ViewById(R.id.button8) protected Button button8;
    @ViewById(R.id.button9) protected Button button9;
    @ViewById(R.id.button10) protected Button button10;
    @ViewById(R.id.button11) protected Button button11;
    @ViewById(R.id.button12) protected Button button12;
    @ViewById(R.id.button13) protected Button button13;
    @ViewById(R.id.button14) protected Button button14;
    @ViewById(R.id.button15) protected Button button15;

    @Override
    protected void onCreate(Bundle savedInstanceState) {
        super.onCreate(savedInstanceState);
        // NO NEED TO INITIALIZE COMPONENTS ANYMORE
        // ONLY 62 LINES AGAINST 139 LINES (2 TIMES LESS CODE)
        // LESS COPY/PASTE ERROR
    }

    // No switch-cases anymore...
    // Handle clicks together or independently ...
    // No need to implement onClickListener anymore... 
    @Click({R.id.button1,R.id.button2,R.id.button3}) void onButton1Clicked() {handleClick();};
    @Click({R.id.button4,R.id.button5,R.id.button6}) void onButton4Clicked() {handleClick();};
    @Click({R.id.button7,R.id.button8,R.id.button9}) void onButton7Clicked() {handleClick();};
    @Click({R.id.button10,R.id.button11,R.id.button12}) void onButton10Clicked() {handleClick();};
    @Click(R.id.button13) void onButton13Clicked() {handleClick();};
    @Click(R.id.button14) void onButton14Clicked() {handleClick();};
    @Click(R.id.button15) void onButton15Clicked() {handleClick();};

    private void handleClick(){
        Toast.makeText(this, "AndroidAnnotations are cool!", Toast.LENGTH_SHORT).show();
    }

    @Override
    public boolean onCreateOptionsMenu(Menu menu) {
        // Inflate the menu; this adds items to the action bar if it is present.
        getMenuInflater().inflate(R.menu.main, menu);
        return true;
    }
}


That's all. Hope you like it.

😱👇 PROMOTIONAL DISCOUNT: BOOKS AND IPODS PRO ðŸ˜±ðŸ‘‡

Be sure to read, it will change your life!
Show your work by Austin Kleonhttps://amzn.to/34NVmwx

This book is a must read - it will put you in another level! (Expert)
Agile Software Development, Principles, Patterns, and Practiceshttps://amzn.to/30WQSm2

Write cleaner code and stand out!
Clean Code - A Handbook of Agile Software Craftsmanship: https://amzn.to/33RvaSv

This book is very practical, straightforward and to the point! Worth every penny!
Kotlin for Android App Development (Developer's Library): https://amzn.to/33VZ6gp

Needless to say, these are top right?
Apple AirPods Pro: https://amzn.to/2GOICxy

😱👆 PROMOTIONAL DISCOUNT: BOOKS AND IPODS PRO ðŸ˜±ðŸ‘†

How to create an awesome partial transparent dialog(like) Activity Android

Hi there!

Today i'll show, how to make the diffence in your profissional apps by designing real cool, awesome activities. In this sample i'm gonna share how we can create an activity that looks like a dialog with some partial transparent parts, which allows me to see the background of the launcher main activity.

Here is the sketch to visualize the idea behind the text:


Create a sample project

Create an Android Project and define your main activity as ExampleActivity. After that, create a second activity called PhotoPickerActivity. Don´t worry about the details. We will see it a few steps ahead. Just create it and leave it empty. Define in the layout of  ExampleActivity only a single button, add an OnClickListener to it and as soon as the button is pressed, call an action like that:

Intent intent = new Intent(getContext(), PhotoPickerActivity.class);
getActivity().startActivityForResult(intent, PhotoPickerActivity.REQUEST_CODE_OPEN_GALLERY);


Activity dialog style.

Create a style.xml in the folder: res>values like that:


Layout of PhotoPickerActivity

Create a layout called for example: activity_photo_picker.xml in folder: res>layout like that:


Manifest Entry

In your manifest, make sure you've added the following code snippet to it(Make sure the package name matches your own definition. In my case it is called com.treslines.ExampleActivity):


Content of PhotoPickerActivity

Copy/paste the next code section into PhotoPickerActivity.

public class PhotoPickerActivity extends Activity implements OnClickListener {

    public static final String ACTION_NAVIGATE_BACK = "ACTION_NAVIGATE_BACK";
    public static final String ACTION_PHOTO_SHOT = "ACTION_PHOTO_SHOT";
    public static final String ACTION_PHOTO_TAKEN = "ACTION_PHOTO_TAKEN";
    public static final int REQUEST_CODE_OPEN_GALLERY = 20;

    @Override
    public void onCreate(Bundle savedInstanceState) {
        super.onCreate(savedInstanceState);
        setContentView(R.layout.activity_photo_picker);
        findViewById(R.id.close_view).setOnClickListener(this);
        findViewById(R.id.camera_view).setOnClickListener(this);
        inflatePhotoViewsToShow();
    }

    private void inflatePhotoViewsToShow() {
        // 1. Load photos from a service
        // 2. inflate photos in views here...
        // 3. add listener this click listener to each one
        // 4. add real data to the switch cases
    }

    @Override
    public void onClick(View v) {
        int id = v.getId();
        switch (id) {

        case R.id.close_view:
            Intent navigateBack = new Intent(this, ExampleActivity.class);
            navigateBack.setAction(ACTION_NAVIGATE_BACK);
            navigateBack.setData(Uri.EMPTY); 
            setResult(Activity.RESULT_OK, navigateBack);
            finish();
            break;

        case R.id.camera_view:
            Intent photoShot = new Intent();
            photoShot.setAction(ACTION_PHOTO_SHOT);
            photoShot.setData(Uri.EMPTY); // set real data here...
            setResult(Activity.RESULT_OK, photoShot);
            finish();
            break;
            
        // photo has been taken (selected)
        default:
            Intent photoTaken = new Intent();
            photoTaken.setAction(ACTION_PHOTO_TAKEN);
            photoTaken.setData(Uri.EMPTY); // set real data here...
            setResult(Activity.RESULT_OK, photoTaken);
            finish();
            break;
        }
    }

}


OnActivityResult from ExampleActivity

In the method onActivityResult from your main class ExampleActivity, make sure you've added the content bellow:

@Override
    protected void onActivityResult(int requestCode, int resultCode, Intent data) {

        if (resultCode == Activity.RESULT_OK) {
            
            if (requestCode == PhotoPickerActivity.REQUEST_CODE_OPEN_GALLERY) {
                if(!PhotoPickerActivity.ACTION_NAVIGATE_BACK.equals(data.getAction())){
                    if(PhotoPickerActivity.ACTION_PHOTO_SHOT.equals(data.getAction())){
                        Toast.makeText(this, "photo shot over camera", Toast.LENGTH_SHORT).show();
                    }else if(PhotoPickerActivity.ACTION_PHOTO_TAKEN.equals(data.getAction())){
                        Toast.makeText(this, "photo selected over photo picker", Toast.LENGTH_SHORT).show();
                    }
                }
            }

 }
}

That's all i hope you like it.

😱👇 PROMOTIONAL DISCOUNT: BOOKS AND IPODS PRO ðŸ˜±ðŸ‘‡

Be sure to read, it will change your life!
Show your work by Austin Kleonhttps://amzn.to/34NVmwx

This book is a must read - it will put you in another level! (Expert)
Agile Software Development, Principles, Patterns, and Practiceshttps://amzn.to/30WQSm2

Write cleaner code and stand out!
Clean Code - A Handbook of Agile Software Craftsmanship: https://amzn.to/33RvaSv

This book is very practical, straightforward and to the point! Worth every penny!
Kotlin for Android App Development (Developer's Library): https://amzn.to/33VZ6gp

Needless to say, these are top right?
Apple AirPods Pro: https://amzn.to/2GOICxy

😱👆 PROMOTIONAL DISCOUNT: BOOKS AND IPODS PRO ðŸ˜±ðŸ‘†

Saturday, December 7, 2013

How to identify design pattern before coding?

Hi there!

In this post we will learn how to identify design pattern before coding! Isn't it exciting? As you probabilly know, i'm addicted to design patterns. I've read a lot of good books and probabilly as you, my biggest problem was always the identification of cases/scenarios in which i could use them.

There are great books out there, but none of them explains in a simple way, how to identify it. Most of them says: "It depends on the usecase or it depends on the dev's expirience" In fact the expirience (years that you have been working on the software business) may help you identifying the right patterns to be used in some default scenarios, but can't we learn it a little bit faster? Do we have to wait years to get it done right?

Motivated by those questions, i've been trying to identify the patterns by the last mobile project i made. I was very surprised how simple it can be and how much better understandable, extensible and readable my end project was. All you need to do is to sketch it first. Really!!! That's all. Don't worry, we will see the whole process step by step. :-)

The Patterns

In this tutorial we will learn how i was able to identify a bunch of patterns before starting coding (Please note: In this tutorial i will not explain why a specific pattern is good or not. I will assume you know already design pattern and are interested in see how/when to apply it) In my project i was able to identify the following patterns:

  • Command Pattern
  • State Pattern
  • Adapter Pattern
  • Null Object Pattern
  • Singleton Pattern
  • Observer Pattern (Listeners)
  • Template Method Pattern

The Challange

Ok, let's get to an apparently simple, but real project. Imagine you have the following challange:

You have 4 buttons on a toolbar on the bottom of your application. Every button starts its own animation  when it is tapped (let's say it is moved upward to show its activity) and after its animation is done, a second animation starts. (let's say a column is slided out showing icons on it). Can you imagine it? something like this:

Sketch

The requirements

Ok, let's move on. Here are futher requirements:
  • Every animation has to be synchronized which means, if an animation is running, none of the other animations can be started, till it ends. 
  • After every transition (animation) we should have the possibility of excuting some actions if we need. (let's say play a sound or execute a desired action)
  • Every button must be locked to each other. This means, if i press and hold one button, i can't fire another action by pressing anoter button.
  • If we touch the screen and an animation is showing already, this animation will slide back and a defined dafault button will be selected. (will be moved a little bit upward)

How can i identify the patterns now?

Know that we have sketched the scenarios and have listed the requirements, how can we identify proper pattern to use in this case?

Well, what i have done was to simple imagine the five buttons as a TV-Remote control and the animations as transition states on my screen. Doing that way it was almost impossible to not see the patterns. So i thought i had commands to start the animations (Command Pattern) and i thought i had states to represent any animation's transition. (State Pattern) - The key to this was the sketch i made. Imagine: Without it, it would be almost impossible to see it.

We should give the possibility to fire actions between states. And because this should be only possibilities, i can imagine scenarios in which there will be no actions also possible right? And here they are: NullState, NullAction and NullCommand. (Null Object Pattern)

Ok let's think further. As a requirement we must ensure singularity to any button. So i automatically see the picture of a lock, because there should be only one way to start actions. In that case we need a global accessible but unique flag to control that. (Synchronized Singleton Pattern)

And last but not least, as we will be dealing with a lot of action listeners and because of the button's synchronization, it would be necessary to implement a lot of individual Listeners for every button. If we do that way, we would end up with a bunch of duplicated code lines. For this reason we should implement an adapter of the TouchListener in which we place the lock logic in central unique place (Template Method Pattern), making it available for all buttons in the aplication. (Adapter Pattern). So i ended up with a simple but very usefull class diagram like that bellow which i used to define the app's architecture (structural part of it):

initial class diagram

Conclusion

In my opinion at least two things are indispensable in the process of figuring out what design pattern to apply:
  • a sketch 
  • as many requirements as available

Share your expirience

If you know other simple, practical ways on how to find out which design pattern to use, please feel free to contact me and share your thoughts.  It would be great to se the usage of other pattern in practise. (real projects) like i did. That's all. hope you like it.

😱👇 PROMOTIONAL DISCOUNT: BOOKS AND IPODS PRO ðŸ˜±ðŸ‘‡

Be sure to read, it will change your life!
Show your work by Austin Kleonhttps://amzn.to/34NVmwx

This book is a must read - it will put you in another level! (Expert)
Agile Software Development, Principles, Patterns, and Practiceshttps://amzn.to/30WQSm2

Write cleaner code and stand out!
Clean Code - A Handbook of Agile Software Craftsmanship: https://amzn.to/33RvaSv

This book is very practical, straightforward and to the point! Worth every penny!
Kotlin for Android App Development (Developer's Library): https://amzn.to/33VZ6gp

Needless to say, these are top right?
Apple AirPods Pro: https://amzn.to/2GOICxy

😱👆 PROMOTIONAL DISCOUNT: BOOKS AND IPODS PRO ðŸ˜±ðŸ‘†


Wednesday, November 6, 2013

How to create a bit state register java android

Hi there! Today i'gonna share/show how we could create a bit state register, manupulate bit states doing OR and AND operations on it. Favor/consider always the state pattern whenever possible over this solution here. I use it when the state pattern is not our first choice or is inappropriate. (when it gets to complex or i'm doing simple state checks and the design is simple, fixed and not intented to be extended) It is a simple 32 states bit processor which can hold up to max 32 states. The result at the end will be something like in the class diagram bellow:


BitStates

/**
 * Bit states to represent 32 possible states. The first state is the mask state to reset states.
 * Those states can be used to define component transition states while animating it.
 * 
INSTRUCTIONS ON HOW TO USE IT:

 * In combination with a state pattern, you may associate any bit state to a transition, position, animation or whatever you need to monitor in a proper sequence. 
 * For example: If you want to know that a button X has been pressed, animation Y is done and Fragment Z is shown, associate a bit state to each of them
 * and do an "or-operation" on it. You'll be able now to extract all those information (3 states) from just one bit combination without having to explicitly ask for it using a lot of if/else cases.
 * 
  BIT STATE REPRESENTATION            HEX CODE REPRESENTATION
  00000000000000000000000000000000 0
 00000000000000000000000000000001 1
 00000000000000000000000000000010 2
 00000000000000000000000000000100 4
 00000000000000000000000000001000 8
 00000000000000000000000000010000 10
 00000000000000000000000000100000 20
 00000000000000000000000001000000 40
 00000000000000000000000010000000 80
 00000000000000000000000100000000 100
 00000000000000000000001000000000 200
 00000000000000000000010000000000 400
 00000000000000000000100000000000 800
 00000000000000000001000000000000 1000
 00000000000000000010000000000000 2000
 00000000000000000100000000000000 4000
 00000000000000001000000000000000 8000
 00000000000000010000000000000000 10000
 00000000000000100000000000000000 20000
 00000000000001000000000000000000 40000
 00000000000010000000000000000000 80000
 00000000000100000000000000000000 100000
 00000000001000000000000000000000 200000
 00000000010000000000000000000000 400000
 00000000100000000000000000000000 800000
 00000001000000000000000000000000 1000000
 00000010000000000000000000000000 2000000
 00000100000000000000000000000000 4000000
 00001000000000000000000000000000 8000000
 00010000000000000000000000000000 10000000
 00100000000000000000000000000000 20000000
 01000000000000000000000000000000 40000000
 10000000000000000000000000000000 80000000
 * 
* @author Ricardo Ferreira 01/11/2013 * */ public enum BitStates { STATE_00(0x0), STATE_01(0x1), STATE_02(0x2), STATE_03(0x4), STATE_04(0x8), STATE_05(0x10), STATE_06(0x20), STATE_07(0x40), STATE_08(0x80), STATE_09(0x100), STATE_10(0x200), STATE_11(0x400), STATE_12(0x800), STATE_13(0x1000), STATE_14(0x2000), STATE_15(0x4000), STATE_16(0x8000), STATE_17(0x10000), STATE_18(0x20000), STATE_19(0x40000), STATE_20(0x80000), STATE_21(0x100000), STATE_22(0x200000), STATE_23(0x400000), STATE_24(0x800000), STATE_25(0x1000000), STATE_26(0x2000000), STATE_27(0x4000000), STATE_28(0x8000000), STATE_29(0x10000000), STATE_30(0x20000000), STATE_31(0x40000000), STATE_32(0x80000000); private int state; private BitStates(int state) { this.state = state; } public int getState() { return state; } }

BitStateRegister

import java.util.HashMap;
import java.util.Map;

// Singleton Pattern
/**
 * Use this register to associate bit states to concrete states in a state pattern.
 * This register can hold up to 33 bit states,while the 0 state is per default the
 * zero state (reset mask state).
 * @author Ricardo Ferreira 02/11/2013
 *
 */
public class BitStateRegister {

 private static final BitStateRegister INSTANCE = new BitStateRegister();
 private static final Map stateRegister = new HashMap();
 private static final int registerMaxSize = 33;

 private BitStateRegister() {
  // Singleton Pattern
 }

 public static BitStateRegister getInstance() {
  registerZeroStateOnlyOnce();
  return INSTANCE;
 }
 
 private static void registerZeroStateOnlyOnce(){
  if (!stateRegister.containsKey("zero")) {
   stateRegister.put("zero", BitStates.STATE_00.getState());
  }
 }

 /**
  * State Register. It registers a new state only if not exists already. 

  * This Register is able to register from 1 up to 32 states in a 32 bit system.

  * You do not have to care about it. The states will be created and increased

  * automatically, when registered.

 
  * 
  * To obtain the zero state(reset mask state), call getState("zero"); on it.

  * To check if the register is already completely full, call isRegisterComplete(); on it.
  * 
  * @param stateClassSimpleName the simple class name provided by calling: ConcreteState.class.getSimpleName(); on your concrete state.
  * @return true if the new state was created, false if the state already exists or the register is full.
  */
 public boolean registerStateFor(String stateClassSimpleName) {
  boolean operationResult = false;
  if (!stateRegister.containsKey(stateClassSimpleName) && stateRegister.size() < registerMaxSize) {
   int nextStateIndex = stateRegister.size();
   int newState = BitStates.values()[nextStateIndex].getState();
   stateRegister.put(stateClassSimpleName, newState);
   operationResult = true;
  }
  return operationResult;
 }

 public boolean unregisterStateFor(String stateClassSimpleName){
  boolean operationResult = false;
  if (stateRegister.containsKey(stateClassSimpleName)) {
   Integer bitState = stateRegister.get(stateClassSimpleName);
   stateRegister.remove(bitState);
   operationResult = true;
  }
  return operationResult;
 }

 public int getStateFor(String stateClassSimpleName) {
  return stateRegister.get(stateClassSimpleName);
 }

 /**
  * Returns true if the Register is already completely filled up with 32 states , false otherwise.
  * 
  * @return true if the Register is already completely filled up with 32 states , false otherwise
  */
 public boolean isRegisterComplete() {
  return stateRegister.size() == registerMaxSize;
 }
 
 /**
  * Checks if the state of the given state class name is set in the current bit state.
  * @param currentBitState the current bit state
  * @param stateClassSimpleName the simple class name provided by calling: ConcreteState.class.getSimpleName(); on your concrete state.
  * @return true if the bit is set, false otherwise.
  */
 public boolean isBitStateSetted(int currentBitState, String stateClassSimpleName){
  boolean operationResult = false;
  if(stateRegister.containsKey(stateClassSimpleName)){
   int stateFor = getStateFor(stateClassSimpleName);
   if((stateFor&currentBitState)==stateFor){
    operationResult = true;
   }
  }
  return operationResult;
 }

}

BitStateProcessor

/**
 * A bit state processor with a process state capacity of max 32 states.
 * Favor/consider always the usage of a state pattern instead of it. 
 * But in case the state pattern is inappropriate, you can use it.
 * 
 * @author Ricardo Ferreira 06/11/2013
 * 
 */
public class BitStateProcessor {
 private int resetMask = BitStateRegister.getInstance().getStateFor("zero");
 private int currentBitState = 0x0;
 private int internalState = 0x0;
 private String stateClassSimpleName;

 /**
  * @param stateClassSimpleName
  *            the simple class name of your concrete state provided by calling ConcreteState.class.getSimpleName();
  */
 public BitStateProcessor(int currentBitState, String stateClassSimpleName) {
  this.currentBitState = currentBitState;
  this.stateClassSimpleName = stateClassSimpleName;
  BitStateRegister.getInstance().registerStateFor(stateClassSimpleName);
  this.internalState = BitStateRegister.getInstance().getStateFor(stateClassSimpleName);
 }

 public int getCurrentBitState() {
  return this.currentBitState;
 }

 public void setCurrentBitState(int currentBitState) {
  this.currentBitState = currentBitState;
 }

 public void resetCurrentBitState() {
  this.currentBitState = this.currentBitState & this.resetMask;
 }

 public boolean isBitStateSetted() {
  return BitStateRegister.getInstance().isBitStateSetted(this.currentBitState, this.stateClassSimpleName);
 }

 public boolean unregisterStateFor(String stateClassSimpleName) {
  return BitStateRegister.getInstance().unregisterStateFor(stateClassSimpleName);
 }

 public boolean isRegisterComplete() {
  return BitStateRegister.getInstance().isRegisterComplete();
 }

 public int getStateFor(String stateClassSimpleName) {
  return BitStateRegister.getInstance().getStateFor(stateClassSimpleName);
 }

 /**
  * Returns a new bit state.
  * 
  * @param currentBitState the actual bit state passed to this class or method
  * @return the new bit state after an "or-operarion" with its internal state.
  */
 public int processCurrentBitState(int currentBitState) {
  this.currentBitState = this.internalState | currentBitState;
  return this.currentBitState;
 }

}

That's all! hope you like it!

😱👇 PROMOTIONAL DISCOUNT: BOOKS AND IPODS PRO ðŸ˜±ðŸ‘‡

Be sure to read, it will change your life!
Show your work by Austin Kleonhttps://amzn.to/34NVmwx

This book is a must read - it will put you in another level! (Expert)
Agile Software Development, Principles, Patterns, and Practiceshttps://amzn.to/30WQSm2

Write cleaner code and stand out!
Clean Code - A Handbook of Agile Software Craftsmanship: https://amzn.to/33RvaSv

This book is very practical, straightforward and to the point! Worth every penny!
Kotlin for Android App Development (Developer's Library): https://amzn.to/33VZ6gp

Needless to say, these are top right?
Apple AirPods Pro: https://amzn.to/2GOICxy

😱👆 PROMOTIONAL DISCOUNT: BOOKS AND IPODS PRO ðŸ˜±ðŸ‘†