Tuesday, May 13, 2014

How to add advertisement (monetize) to your mobile app in android

Hi there!

today i'm gonna show, how to embed advertisements (AdMob) in your android application. I found the tutorials on the internet not so intuitive and that's the reason i'm sharing this with you. It is very streight forward if you know how... ;)

In my case, the end product was a very simple application with a single banner advertisement on the middle of the screen. It is up to you where to place it. My end result is a street narrator. It speaks to you loud the name of the streets you drive thru. This way you can concentrate on transit, if you are looking for a specific address. It is awesome if you are a courier or driving in a foreign country. It speaks 6 diffent languages. It also alerts you if you are driving to fast. Specially in countries with bad signalization it is wonderful. Search for Road Narrator on Google Play Store if you want to test it. Here is a screen shot of it:


Important: Bevor you start with this post, make sure you have a valid AdMob account and valid AdSense and AdWord Accounts on Google. Otherwise at the end of this post you'll not be able to test it. (without it, you'll not be able to generate your AdMod advertisement key)

Step 1:

if you don't have it already, please make sure you have downloaded the google play services like shown in the picture bellow:

Step 2:

Import the downloaded google play service lib as shown. Locate your android sdk and look for the extra folder. In there it will be the  google_play_service_lib.


Step 3:

Right click on your project > properties > Android > select the new available, imported google_play_services_lib by pressing add as shown:


Step 4:

In your project manifest make sure you have defined the followed entries:

Step 5:

In your activity_main.xml layout define (anywhere you want and need) a linearlayout like this:

Step 6:

On the top of your MainActivity define those private variables. Please NOTE, that the MY_AD_UNIT_ID is a ID you'll get as soon as you have your AdMob account. The id bellow is a fake one. (you don't want my ID right? ;)

Step 7:

At the end of your onCreate() method of MainActivity.java call the method createAdView() like definition bellow: (create it in your own) 


Then make sure you have the following entries in the methods onPause, onDestroy and onResume:

That's all! You should now be able to run it and if you are connected with the internet, you will see your first advertisement banner on the screen in the place you've defined.

Hope you like it. ;) 

😱👇 PROMOTIONAL DISCOUNT: BOOKS AND IPODS PRO ðŸ˜±ðŸ‘‡

Be sure to read, it will change your life!
Show your work by Austin Kleonhttps://amzn.to/34NVmwx

This book is a must read - it will put you in another level! (Expert)
Agile Software Development, Principles, Patterns, and Practiceshttps://amzn.to/30WQSm2

Write cleaner code and stand out!
Clean Code - A Handbook of Agile Software Craftsmanship: https://amzn.to/33RvaSv

This book is very practical, straightforward and to the point! Worth every penny!
Kotlin for Android App Development (Developer's Library): https://amzn.to/33VZ6gp

Needless to say, these are top right?
Apple AirPods Pro: https://amzn.to/2GOICxy

😱👆 PROMOTIONAL DISCOUNT: BOOKS AND IPODS PRO ðŸ˜±ðŸ‘†

Tuesday, April 8, 2014

Applying decorator pattern to decorate views on Android

Hi there!

Today i'm gonna show how to apply the design pattern decorator to android's views making use of its dependency injection's concept. I thought it was a nice, clear and simple way to decorate views and that's my motivator to share it with you. I'm assuming you know the decorator pattern already and are looking for real examples involving android. If you are trying to understand the concept behind it, this is also a good article but you may need to learn the fundamentals first. There are a bunch of good books out there. I personally recommend head first.

In this example i'll try to show how to decorate a view with icons dynamically. Something similar to eclipse's tree decoration while some compile error or warning appears on the package structure. We will end up with something like that:

Error/warning tree 
decoration in eclipse


Our view decoration 
examplein Android

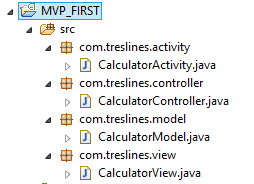
Let's visualize the structure by defining the UML-diagram


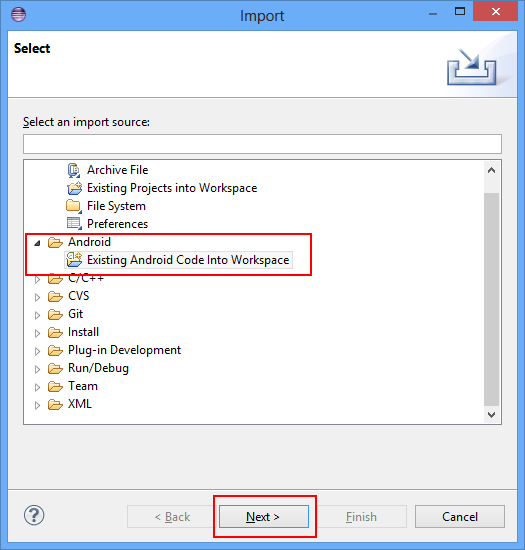
First create a blank android's project

Put some icons of your choice in the folder drawable-yourChoice. In my example i took the drawable-xhdpi. I took the icons directly from my eclipse package. You may use your own icons.

Layouting the view

Ok, now copy this code into your activity_main.xml layout:
< RelativeLayout xmlns:android="http://schemas.android.com/apk/res/android"
    xmlns:tools="http://schemas.android.com/tools"
    android:layout_width="match_parent"
    android:layout_height="match_parent"
    android:paddingBottom="@dimen/activity_vertical_margin"
    android:paddingLeft="@dimen/activity_horizontal_margin"
    android:paddingRight="@dimen/activity_horizontal_margin"
    android:paddingTop="@dimen/activity_vertical_margin"
    tools:context=".MainActivity" >

    < ImageView
        android:id="@+id/middle"
        android:layout_width="200dp"
        android:layout_height="200dp"
        android:layout_centerHorizontal="true"
        android:layout_centerVertical="true"
        android:src="@drawable/ic_launcher" / >

    < ImageView
        android:id="@+id/leftTop"
        android:layout_width="30dp"
        android:layout_height="30dp"
        android:layout_alignLeft="@+id/middle"
        android:layout_alignTop="@+id/middle"
         / >

    < ImageView
        android:id="@+id/rightTop"
        android:layout_width="30dp"
        android:layout_height="30dp"
        android:layout_alignRight="@+id/middle"
        android:layout_alignTop="@+id/middle"
         / >

    < ImageView
        android:id="@+id/leftBottom"
        android:layout_width="30dp"
        android:layout_height="30dp"
        android:layout_alignBottom="@+id/middle"
        android:layout_alignLeft="@+id/middle"
         / >

    < ImageView
        android:id="@+id/rightBottom"
        android:layout_width="30dp"
        android:layout_height="30dp"
        android:layout_alignBottom="@+id/middle"
        android:layout_alignRight="@+id/middle"
         / >

    < ImageView
        android:id="@+id/middleTop"
        android:layout_width="30dp"
        android:layout_height="30dp"
        android:layout_alignTop="@+id/middle"
        android:layout_centerHorizontal="true"
         / >

< / RelativeLayout >

The common decorator interface

Well ok, let's start by defining the common decorator interface:
/**
 * The common decorable interface to be used while implementing decorators.
 * @author Ricardo Ferreira
 * @version 1.0
 * @since 07/04/2014
 */
public interface Decorable {
    /** implements the concrete decorator's behavior */
    void decorate();
}

Defining the decorators contract

This class defines what kind of object we want to decorate. In our case an android's view which belongs to the Android's API itself:
import java.util.Arrays;
import android.content.Context;
import android.view.View;
/**
 * Used to define the decorator's contract. In this case to decorate a view with icons
 * @author Ricardo Ferreira
 * @version 1.0
 * @since 07/04/2014
 */
public abstract class AbstractIconDecorator implements Decorable{
    
    protected View view;
    protected View[] views;
    protected int drawableId;
    protected Context context;
    /**
     * Concrete classes must call this constructor to conform the decorator's contract.
     * @param context the app's context
     * @param view the view to be decorated
     * @param drawableId the drawable id dependency over R.drawable.yourId to be set 
     * as background to the view of this constructor.
     */
    public AbstractIconDecorator(Context context, View view, int drawableId){
        super();
        this.view = view;
        this.context = context;
        this.drawableId = drawableId;
        decorate();
    }
    /**
     * Concrete classes must call this constructor to conform the undo decorator's contract.
     * @param context context the app's context
     * @param views the views to be undone. 
     */
    public AbstractIconDecorator(Context context,View[] views){
        super();
        this.context = context;
        this.views = Arrays.copyOf(views, views.length);
        decorate();
    }
}

Implementing a master icon decorator

This is a very nice implementation that takes advantage of android's concept of dependency injection over the resource class R.drawable.myId. Using it, we don't have to implement a lot of decorators. Instead of it, we implement just one and inject our dependencies according to our needs as you will see.
import android.content.Context;
import android.view.View;
/**
 * Use this class to decorate views with icons thru dependency injection passing R.drawable.yourId
 * @author Ricardo Ferreira
 * @version 1.0
 * @since 07/04/2014
 */
public class IconDecorator extends AbstractIconDecorator{

    /**
     * Creates an universal icon decorator to be used while dealing with view's decoration.
     * @param context the app's context
     * @param view the view to be decorated
     * @param drawableId the drawable id dependency over R.drawable.yourId to be set 
     * as background to the view of this constructor.
     */
    public IconDecorator(Context context,View view, int drawableId){
        super(context, view, drawableId);
    }
    @Override
    public void decorate() {
        view.setBackground(context.getResources().getDrawable(drawableId));
    } 
} 

Implementing an undo decorator to revert decorations

This is a special kind of decoration. I will decorate the main icon(the android's green robot icon) with "nothing" making all decorations disappear.
/**
 * Use this decorator to undo decoration by passing the view to be undone.
 * @author Ricardo Ferreira
 * @version 1.0
 * @since 07/04/2014
 */
public class ClearIconDecorator extends AbstractIconDecorator{

    /**
     * Creates an undo decorator.
     * @param context the app's context
     * @param views the views that has been decorated to be undone.
     */
    public ClearIconDecorator(Context context,View[] views){
        super(context,views);
    }
    @Override
    public void decorate() {
        for (View view : views) {
            view.setBackground(null);
        }
    } 
}

The main activity

Now the final step before running it. In this example i am simulating the decoration over clicks. But in your professional applications those decorations may occur while something go wrong or right or you may need to give some visual user feedbacks while doing something. Use your imagination ;)
import android.app.Activity;
import android.os.Bundle;
import android.view.View;
import android.view.View.OnClickListener;

public class MainActivity extends Activity implements OnClickListener{

    private View middle;
    private View leftTop;
    private View leftBottom;
    private View rightBottom;
    private View rightTop;
    private View middleTop;
    
    @Override
    protected void onCreate(Bundle savedInstanceState) {
        super.onCreate(savedInstanceState);
        setContentView(R.layout.activity_main);
        
        middle = findViewById(R.id.middle);
        leftTop = findViewById(R.id.leftTop);
        leftBottom = findViewById(R.id.leftBottom);
        rightBottom = findViewById(R.id.rightBottom);
        rightTop = findViewById(R.id.rightTop);
        middleTop= findViewById(R.id.middleTop);
        
        leftTop.setOnClickListener(this);
        leftBottom.setOnClickListener(this);
        rightBottom.setOnClickListener(this);
        rightTop.setOnClickListener(this);
        middle.setOnClickListener(this);
        middleTop.setOnClickListener(this);
    }

    @Override
    public void onClick(View view) {
        switch (view.getId()) {
            
        case R.id.leftTop:
            new ErrorIconDecorator(view);
            break;
            
        case R.id.leftBottom:
            new WarningIconDecorator(view);
            break;
            
        case R.id.rightTop:
            new InfoIconDecorator(view);
            break;
            
        case R.id.rightBottom:
            new QuickFixIconDecorator(view);
            break;
            
        case R.id.middleTop:
            new IconDecorator(this,view, R.drawable.newpack_wiz);
            break;
            
        case R.id.middle:
            final View[] views = new View[]{leftTop,leftBottom,rightTop,rightBottom,middleTop};
            new UndoIconDecorator(views);
            break;
        default:
            break;
        }
    }
    
    // you may define specific decorators to your convenience... 
    // ... or you may use directly the universal decorator IconDecorator(...). 
    // It is up to your. Here i'm showing both examples
    
    public class WarningIconDecorator{
        public WarningIconDecorator(View view){
            new IconDecorator(MainActivity.this, view, R.drawable.warning_obj);
        }
    }
    
    public class ErrorIconDecorator {
        public ErrorIconDecorator(View view){
            new IconDecorator(MainActivity.this, view, R.drawable.error);
        }
    }
    
    public class InfoIconDecorator {
        public InfoIconDecorator(View view){
            new IconDecorator(MainActivity.this, view, R.drawable.information);
        }
    }
    
    public class PackageDecorator {
        public PackageDecorator(View view){
            new IconDecorator(MainActivity.this, view, R.drawable.package_obj);
        }
    }
    
    public class QuickFixIconDecorator {
        public QuickFixIconDecorator(View view){
            new IconDecorator(MainActivity.this, view, R.drawable.quickfix_error_obj);
        }
    }
    
    public class ErrorWarningDecorator {
        public ErrorWarningDecorator(View view){
            new IconDecorator(MainActivity.this, view, R.drawable.errorwarning_tab);
        }
    }
    
    public class UndoIconDecorator{
        public UndoIconDecorator(View[] views){
            new ClearIconDecorator(MainActivity.this, views);
        }
    }
}
So that's all. Hope you like it.
 
😱👇 PROMOTIONAL DISCOUNT: BOOKS AND IPODS PRO ðŸ˜±ðŸ‘‡

Be sure to read, it will change your life!
Show your work by Austin Kleonhttps://amzn.to/34NVmwx

This book is a must read - it will put you in another level! (Expert)
Agile Software Development, Principles, Patterns, and Practiceshttps://amzn.to/30WQSm2

Write cleaner code and stand out!
Clean Code - A Handbook of Agile Software Craftsmanship: https://amzn.to/33RvaSv

This book is very practical, straightforward and to the point! Worth every penny!
Kotlin for Android App Development (Developer's Library): https://amzn.to/33VZ6gp

Needless to say, these are top right?
Apple AirPods Pro: https://amzn.to/2GOICxy

😱👆 PROMOTIONAL DISCOUNT: BOOKS AND IPODS PRO ðŸ˜±ðŸ‘†

Thursday, April 3, 2014

How to create an ImageLoader for a huge amount of images on Android

Hi there!

During development with a huge amount of images, most of all image loaders available out there, does not display(caches) the images smoothlty. For this reason, i have tryed to put all the code "pieces" i found in the internet together to get a almost perfect image loader for my application. The result is shown bellow. It works very well for me. It may be also interesting for other developers. Here is my solution:

The Loader interface

/**
 * Drawable loader used to create and cache thumbnails while presenting it in a gallery preview.
 * IMPORTANT: instantiate it in your main activity like this:
 * 

 * protected void onCreate(final Bundle savedInstanceState) {
 *       super.onCreate(savedInstanceState);
 *       ...
 *       DrawableLoader.getInstance(this);
 *       ...
 *   }
 * 
 * 
* @author Ricardo Ferreira * @version 1.0 * @since 03/04/2014 */ public interface Loader { /** * Clears all instance data and stops running threads */ public void Reset() ; /** * Loads a drawable into an image. Call this method inside of getView(...) from your concrete * implementation of BaseAdapter. *
     * public View getView(int position, View convertView, ViewGroup parent){
     * ...
     * String url = PATH_FILE + pathImage;// path to your storage like "/storage/..."
     * ImageView imageView = (ImageView)holder.imgView;
     * final Drawable placeholder = mContext.getResources().getDrawable(R.drawable.placeholder);
     * DrawableLoader.getInstance(mContext).loadDrawable(url, imageView, placeholder);
     * ...
     * }
     * 
* @param url file path to the storage location * @param imageView the image to be presented in a list view or grid view * @param placeholder the place holder image to be shown, while the loading is running. */ public void loadDrawable(final String url, final ImageView imageView, Drawable placeholder); }

The Loader implementation

/**
 * Drawable loader used to create and cache thumbnails while presenting it in a gallery preview.
 * IMPORTANT: instantiate it in your main activity like this:
 * 

 * protected void onCreate(final Bundle savedInstanceState) {
 *       super.onCreate(savedInstanceState);
 *       ...
 *       DrawableLoader.getInstance(this);
 *       ...
 *   }
 * 
 * 
* @author Ricardo Ferreira * @version 1.0 * @since 03/04/2014 */ @SuppressLint("HandlerLeak") public class DrawableLoader implements Loader{ private final Map < String, SoftReference < Drawable > > mCache = new HashMap < String, SoftReference < Drawable > >(); private final LinkedList < Drawable > mChacheController = new LinkedList < Drawable > (); private ExecutorService mThreadPool; private final Map < ImageView, String > mImageViews = Collections.synchronizedMap(new WeakHashMap < ImageView, String >()); public final static int MAX_CACHE_SIZE = 1024; public final int THREAD_POOL_SIZE = 5; private Context mContext; private static Loader loader; // SINGLETON private DrawableLoader(Context context) { mThreadPool = Executors.newFixedThreadPool(THREAD_POOL_SIZE); mContext=context; } public static Loader getInstance(Context ctx){ if(loader==null){ loader = new DrawableLoader(ctx); } return loader; } public void Reset() { ExecutorService oldThreadPool = mThreadPool; mThreadPool = Executors.newFixedThreadPool(THREAD_POOL_SIZE); oldThreadPool.shutdownNow(); mChacheController.clear(); mCache.clear(); mImageViews.clear(); } public void loadDrawable(final String url, final ImageView imageView, Drawable placeholder) { mImageViews.put(imageView, url); Drawable drawable = getDrawableFromCache(url); if (drawable != null) { imageView.setImageDrawable(drawable); } else { imageView.setImageDrawable(placeholder); queueJob(url, imageView, placeholder); } } private Drawable getDrawableFromCache(String url) { if (mCache.containsKey(url)) { return mCache.get(url).get(); } return null; } private synchronized void putDrawableInCache(String url, Drawable drawable) { int chacheControllerSize = mChacheController.size(); if (chacheControllerSize > MAX_CACHE_SIZE){ mChacheController.subList(0, MAX_CACHE_SIZE / 2).clear(); } mChacheController.addLast(drawable); mCache.put(url, new SoftReference(drawable)); } private void queueJob(final String url, final ImageView imageView, final Drawable placeholder) { /* Create handler in UI thread. */ final Handler handler = new Handler() { @Override public void handleMessage(Message msg) { String tag = mImageViews.get(imageView); if (tag != null && tag.equals(url)) { if (imageView.isShown()) if (msg.obj != null) { imageView.setImageDrawable((Drawable) msg.obj); } else { imageView.setImageDrawable(placeholder); } } } }; mThreadPool.submit(new Runnable() { @Override public void run() { final Drawable bmp = downloadDrawable(url); // if the view is not visible anymore, //the image will be ready for next time in cache if (imageView.isShown()) { Message message = Message.obtain(); message.obj = bmp; handler.sendMessage(message); } } }); } private Drawable downloadDrawable(String url) { final Bitmap decodeBitmap = ViewHelper.decodeBitmap(url.replaceAll("file://", ""), 100); Drawable drawable = new BitmapDrawable(mContext.getResources(), decodeBitmap); putDrawableInCache(url, drawable); return drawable; } /** pass new URL(urlString) to it, while urlString is the path to the drawable like: * http://www.google.com.br/images/your_image.png */ protected Drawable downloadDrawable(URL url) { try { InputStream is = getInputStream(url); Drawable drawable = Drawable.createFromStream(is, url.getPath()); putDrawableInCache(url.getPath(), drawable); return drawable; } catch (MalformedURLException e) { e.printStackTrace(); } catch (IOException e) { e.printStackTrace(); } return null; } private InputStream getInputStream(URL url) throws MalformedURLException, IOException { //URL url = new URL(urlString); URLConnection connection; connection = url.openConnection(); connection.setUseCaches(true); connection.connect(); InputStream response = connection.getInputStream(); return response; } }

That's all. Hope you like it! ;)

😱👇 PROMOTIONAL DISCOUNT: BOOKS AND IPODS PRO ðŸ˜±ðŸ‘‡

Be sure to read, it will change your life!
Show your work by Austin Kleonhttps://amzn.to/34NVmwx

This book is a must read - it will put you in another level! (Expert)
Agile Software Development, Principles, Patterns, and Practiceshttps://amzn.to/30WQSm2

Write cleaner code and stand out!
Clean Code - A Handbook of Agile Software Craftsmanship: https://amzn.to/33RvaSv

This book is very practical, straightforward and to the point! Worth every penny!
Kotlin for Android App Development (Developer's Library): https://amzn.to/33VZ6gp

Needless to say, these are top right?
Apple AirPods Pro: https://amzn.to/2GOICxy

😱👆 PROMOTIONAL DISCOUNT: BOOKS AND IPODS PRO ðŸ˜±ðŸ‘†

Tuesday, April 1, 2014

How to extract ARGB components from color int value

Hi there!

Today i'm gonna show how to extract the color's component Alpha, Red, Green and Blue from an integer value that presents a specific color. The code is very simple and self-explanatory.

/**
     * Returns the color components as alpha, red, green and blue parts in an array.
     * 

     * argb[0] = alpha value
     * argb[1] = red value
     * argb[2] = green value
     * argb[3] = blue value
     * 
* @param color the color value * @return the array containing the color components */ public static int[] getARGB(int color) { /** * Shift all pixels 24 bits to the right. * Do a logical and with 0x000000FF * i.e. 0000 0000 0000 0000 0000 0000 1111 1111 * You will get the alpha value for the color */ int alpha = (color >> 24) & 0x000000FF; /** * Shift all pixels 16 bits to the right. * Do a logical and with 0x000000FF * i.e. 0000 0000 0000 0000 0000 0000 1111 1111 * You will get the red value for the color */ int red = (color >> 16) & 0x000000FF; /** * Shift all pixels 8 bits to the right. * Do a logical and with 0x000000FF * i.e. 0000 0000 0000 0000 0000 0000 1111 1111 * You will get the green value for the color */ int green = (color >>8 ) & 0x000000FF; /** * Dont do any shift. * Do a logical and with 0x000000FF * i.e. 0000 0000 0000 0000 0000 0000 1111 1111 * You will get the blue value for the color */ int blue = (color) & 0x000000FF; return new int[]{alpha,red,green,blue}; } public static int manipulateAlpha(int color, int newAlpha) { final int[] argb = getARGB(color); return Color.argb(random.nextInt(argb[0]), argb[1], argb[2], argb[3]); }


😱👇 PROMOTIONAL DISCOUNT: BOOKS AND IPODS PRO ðŸ˜±ðŸ‘‡

Be sure to read, it will change your life!
Show your work by Austin Kleonhttps://amzn.to/34NVmwx

This book is a must read - it will put you in another level! (Expert)
Agile Software Development, Principles, Patterns, and Practiceshttps://amzn.to/30WQSm2

Write cleaner code and stand out!
Clean Code - A Handbook of Agile Software Craftsmanship: https://amzn.to/33RvaSv

This book is very practical, straightforward and to the point! Worth every penny!
Kotlin for Android App Development (Developer's Library): https://amzn.to/33VZ6gp

Needless to say, these are top right?
Apple AirPods Pro: https://amzn.to/2GOICxy

😱👆 PROMOTIONAL DISCOUNT: BOOKS AND IPODS PRO ðŸ˜±ðŸ‘†

Thursday, March 20, 2014

Normalize file names to conform android's convertions

Hi there!

Today i'm gonna show how to normalize resource file names coming from your designers saving you a lot of time while renaming it. It is more like an util class. It may help you like it helped me. NOTE: I'm using the apache-common-io lib for that.

import java.io.File;
import java.io.FilenameFilter;
import java.io.IOException;

import org.apache.commons.io.FileUtils;
/**
 * Normalizes incorrect file names to conform android's conventions.
 * @author Ricardo Ferreira
 * @version 1.0
 * @since 20/03/2014
 */
public class FileNameNormalizer {

   
    /**
     * Normalizes incorrect file names like "hello kit", "bruno & Mars" or "what-is-that" into "hello_kit", 
     * "bruno_Mars" and "what_is_that". Here an example on how to use it:
     * 

     *  String dir1 = "D:/dir1/";
     *  String dir2 = "D:/dir2/";
     *  String[] fromDirectories = new String[]{dir1,dir2};
     *  String[] withExtensions = new String[]{"gif", "png", "bmp" };
     *  String toDestination = "D:/destination/";
     *  String[] regularExpression =  new String[]{" & "," ","-" };
     *  normalize(fromDirectories, withExtensions, toDestination,regularExpression);
     * 
* @param fromDirectories * @param withExtensions * @param toDestination * @param regularExpression */ public void normalize(String[] fromDirectories, final String[] withExtensions, final String toDestination,String[] regularExpression){//NOPMD for (String fromDirectory : fromDirectories) { normalize(fromDirectory, withExtensions, toDestination,regularExpression); } } private void normalize(String fromDirectory, final String[] withExtensions, final String toDestination, String[] regularExpression){//NOPMD fromDirectory=ensureCorrectDirectory(fromDirectory); String destination = ensureCorrectDirectory(toDestination); File dir = new File(fromDirectory); FilenameFilter filenameFilter = new FilenameFilter() { @Override public boolean accept(final File dir, final String name) { for (final String ext : withExtensions) { if (name.endsWith("." + ext)) { return (true); } } return (false); } }; if (dir.isDirectory()) { for (final File f : dir.listFiles(filenameFilter)) { normalizeAndMoveTo(f.getAbsolutePath(), destination,regularExpression); } } } private String ensureCorrectDirectory(String dir){ if(!dir.endsWith("/")){ dir+="/"; } return dir; } private void normalizeAndMoveTo(String toNomalize, String destination, String[] regularExpression){ File oldFile = new File(toNomalize); File temp = new File(normalizePng(toNomalize,regularExpression)); String newFilePath = destination + temp.getName(); File newFile = new File(newFilePath); try { FileUtils.moveFile(oldFile, newFile); } catch (IOException e) { e.printStackTrace(); } } private String normalizePng(String toNormalize, String[] regularExpression){ String replacement = "_"; String newname = toNormalize; for (String regex : regularExpression) { newname = newname.replaceAll(regex, replacement); } return newname; } }

😱👇 PROMOTIONAL DISCOUNT: BOOKS AND IPODS PRO ðŸ˜±ðŸ‘‡

Be sure to read, it will change your life!
Show your work by Austin Kleonhttps://amzn.to/34NVmwx

This book is a must read - it will put you in another level! (Expert)
Agile Software Development, Principles, Patterns, and Practiceshttps://amzn.to/30WQSm2

Write cleaner code and stand out!
Clean Code - A Handbook of Agile Software Craftsmanship: https://amzn.to/33RvaSv

This book is very practical, straightforward and to the point! Worth every penny!
Kotlin for Android App Development (Developer's Library): https://amzn.to/33VZ6gp

Needless to say, these are top right?
Apple AirPods Pro: https://amzn.to/2GOICxy

😱👆 PROMOTIONAL DISCOUNT: BOOKS AND IPODS PRO ðŸ˜±ðŸ‘†

Monday, February 24, 2014

MVC applied on Android - A practical approach

Hi there!

Today i'm gonna show, how i apply the MVC pattern while developing android applications. I found it so usefull and it separates the concerns in such a nice way, that i think it could be also helpful for others out there.

Some people don't know why we should do that or what is the advantage of it exactly. So before you ask me that ;) here is the explanation of Martin Follower, which a share:

Definition of MVC

"At the heart of MVC is what I call Separated Presentation. The idea behind Separated Presentation is to make a clear division between domain objects that model our perception of the real world, and presentation objects that are the GUI elements we see on the screen. Domain objects should be completely self contained and work without reference to the presentation, they should also be able to support multiple presentations, possibly simultaneously. The fully article can be read here."

And that is exactly what i'm trying to show bellow. A way to decouple View from Model. So in this approach bellow, my View is designed entirely without any logic and don't care about the Model. The model istself contains alls business logics but don't know the View. The Controller is the mediator and is the only one who knows both Model and View. But it does not implement UI or Business Logic. Instead of that, it delegates (mediates) to its delegatees.


Class diagram

To show how it could looks like, i've created a simple calculator project. Lets take a look at the UML and Sequence-diagram first:


Sequence diagram

Und here the sequence diagram:


In the sequence diagram above, the activity representes the HI (Human Interface - Hardware), the View represents the GUI (Grafical User Interface), the Model is responsible for all business logics, the Controller is the mediator and the Calculator, Reseter, DbUpdater and ViewUpdater are the Delegatees from the Controller. They may have access to Model, to View or to both of them.


Creating the project

Create a simple blank project and define the structure like this:

Here you can already see the first advantage of it. We have separeted packages and a clear structure of our architecture already. It makes a lot easier to explain things especially if you are working with distributed teams. For each activity you will have a group of 3 elementes. (MVC)


Creating the Model

The model contains just business logics. In our case a simple calculation. Which can be tested separeted thru junit tests for example. It is not allowed to have any reference to our View. Our example looks like this:


// MODEL'S RESPONSABILITY: 
//
// ACCESS DB USING DAO's AND COMPUTE BUSINESS LOGICS ONLY. IT COMMUNICATES ONLY
// WITH THE CONTROLLER.
//
// IMPORTANT: IT DOESN'T CARE ABOUT VIEW AND IT DOESN'T KNOW NOTHING ABOUT THE VIEW
public class CalculatorModel implements Serializable {

    private static final long serialVersionUID = 1L;
    
    // YOU MAY STORE THING IN THE DB AND QUERY FOR INFORMATION
    // IN THIS SIMPLE EXAMPLE WE JUST HAVE A SIMPLE CALCULATOR MODEL
    private int lastResult;
    private int actualResult;

    public void add2Numbers(int firstNumber, int secondNumber) {
        this.lastResult = firstNumber + secondNumber;
        this.actualResult = this.lastResult;
    }

    public int getActualResult() {
        return actualResult;
    }

    public int getLastResult() {
        return lastResult;
    }

    public void resetActualResult() {
        this.actualResult = 0;
    }

}


Creating the totally dummy View

The view is totally dumm and has no logic inside of it. It contains just the UI objects that will be shown to the user later. Something like this:


define a layout like this for it:
< relativelayout android:layout_height="match_parent" android:layout_width="match_parent" android:paddingbottom="@dimen/activity_vertical_margin" android:paddingleft="@dimen/activity_horizontal_margin" android:paddingright="@dimen/activity_horizontal_margin" android:paddingtop="@dimen/activity_vertical_margin" tools:context=".CalculatorActivity" xmlns:android="http://schemas.android.com/apk/res/android" xmlns:tools="http://schemas.android.com/tools">

    < textview android:id="@+id/textView1" android:layout_height="wrap_content" android:layout_width="wrap_content" android:text="Calulator">

    < edittext android:ems="10" android:id="@+id/firstNumberField" android:layout_alignleft="@+id/textView1" android:layout_alignparentright="true" android:layout_below="@+id/textView1" android:layout_height="wrap_content" android:layout_margintop="16dp" android:layout_width="wrap_content"/ >

    < edittext android:ems="10" android:id="@+id/secondNumberField" android:layout_alignleft="@+id/firstNumberField" android:layout_alignright="@+id/firstNumberField" android:layout_below="@+id/firstNumberField" android:layout_height="wrap_content" android:layout_margintop="18dp" android:layout_width="wrap_content" / >

    < button android:id="@+id/calculateButton" android:layout_alignleft="@+id/secondNumberField" android:layout_below="@+id/secondNumberField" android:layout_height="wrap_content" android:layout_margintop="24dp" android:layout_width="wrap_content" android:text="calculate"/ >

    < textview android:id="@+id/calculationResult" android:layout_alignleft="@+id/calculateButton" android:layout_alignright="@+id/calculateButton" android:layout_below="@+id/calculateButton" android:layout_height="wrap_content" android:layout_margintop="28dp" android:layout_width="wrap_content" android:text="Result" android:textappearance="?android:attr/textAppearanceLarge"/ >

    < textview android:id="@+id/lastCalculationResult" android:layout_alignbottom="@+id/textView1" android:layout_alignright="@+id/firstNumberField" android:layout_height="wrap_content" android:layout_marginleft="37dp" android:layout_torightof="@+id/textView1" android:layout_width="wrap_content" android:text="Last Calculation Result"/ >

    < /textview>< /textview>< /button>< button android:id="@+id/resetButton" android:layout_alignbottom="@+id/calculateButton" android:layout_alignright="@+id/secondNumberField" android:layout_height="wrap_content" android:layout_width="wrap_content" android:text="Reset"/ >

< /relativelayout>

Then create a class in the view package like this:
// VIEW'S RESPONSABILITY: 
//
// INSTANTIATE ALL COMPONENTS AND BIND IT TO THE CONTROLLER. IT COMMUNICATES ONLY WITH
// THE CONTROLLER.
//
// IMPORTANT: IT DOESN'T CARE ABOUT MODEL AND IT DOESN'T KNOW NOTHING ABOUT THE MODEL
public class CalculatorView {
    
    private EditText firstNumberField;
    private EditText secondNumberField;
    private TextView lastCalculationResult;
    private TextView calculationResult;
    private Button calculateButton;
    private Button resetButton;
    protected Activity context;

    public CalculatorView(Activity context) {
        this.context = context;
        defineViewOrientation();
        firstNumberField = (EditText) context.findViewById(R.id.firstNumberField);
        secondNumberField = (EditText) context.findViewById(R.id.secondNumberField);
        calculationResult = (TextView) context.findViewById(R.id.calculationResult);
        lastCalculationResult = (TextView) context.findViewById(R.id.lastCalculationResult);
        calculateButton = (Button) context.findViewById(R.id.calculateButton);
        resetButton = (Button) context.findViewById(R.id.resetButton);
    }
    
    private void defineViewOrientation(){
        context.setRequestedOrientation(ActivityInfo.SCREEN_ORIENTATION_PORTRAIT);
    }

    public void bind(CalculatorController listener) {
        calculateButton.setOnClickListener(listener);
        resetButton.setOnClickListener(listener);
    }
    
    public EditText getFirstNumberField() {
        return firstNumberField;
    }

    public EditText getSecondNumberField() {
        return secondNumberField;
    }

    public TextView getLastCalculationResult() {
        return lastCalculationResult;
    }

    public TextView getCalculationResult() {
        return calculationResult;
    }

}

Creating the Controller

To complete the MVC, define a controller which knows about both model and view. 

// CONTROLLER'S RESPONSABILITY: 
//
// MEDIATE USER'S ACTIONS BETWEEN MODEL AND VIEW. INTERACTS AS A DELEGATOR. 
//
// THIS IS THE CENTRAL PLACE TO LOOK FOR BEHAVIORS. EVERYTHING HAPPENS HERE...
public class CalculatorController extends Observable implements OnClickListener {

    private CalculatorModel model;
    private CalculatorView view;

    public CalculatorController(CalculatorModel model, CalculatorView view) {
        super();
        setModel(model);
        setView(view);
        bindControllerOnView();
        addObservers();
    }
    
    public void addObservers() {
        addObserver(new Calculator());
        addObserver(new Reseter());
    }
    
    private class Calculator implements Observer {
        @Override
        public void update(Observable observable, Object object) {
            if (R.id.calculateButton == ((View) object).getId()) {
                String first = getView().getFirstNumberField().getText().toString();
                String second = getView().getSecondNumberField().getText().toString();
                int firstNumber = Integer.valueOf(first);
                int secondNumber = Integer.valueOf(second);
                getModel().add2Numbers(firstNumber, secondNumber);
                int result = getModel().getActualResult();
                getView().getCalculationResult().setText(String.valueOf(result));
                getView().getLastCalculationResult().setText("Last Result: " + result);
            }
        }
    }

    private class Reseter implements Observer {
        @Override
        public void update(Observable observable, Object object) {
            if (R.id.resetButton == ((View) object).getId()) {
                getView().getCalculationResult().setText(String.valueOf(0));
                getView().getFirstNumberField().setText("");
                getView().getSecondNumberField().setText("");
            }
        }
    }

    @Override
    public void onClick(View view) {
        this.setChanged();
        this.notifyObservers(view);
    }

    public void setView(CalculatorView view) {this.view = view;}
    public CalculatorView getView() {return view;}
    public void setModel(CalculatorModel model) {this.model = model;}
    public CalculatorModel getModel() {return model;}
    public void bindControllerOnView(){getView().bind(this);}

    public void updateView() {/*Auto-generated method stub*/}
    public void updateDb() {/*Auto-generated method stub*/}

}

Using it in the CalculatorActivity

Finally call it in the activity. Take your time to understand it and see how small and understandable the class are. This approach also leads to SRP (single responsibility principle) which is desired and much better then having all havy weight code in one single class. 

The Usage

The final code looks like this:
 
// WHY WE DO THAT? BECAUSE CLEAN CODE MATTERS!!! ;)
//
// IMAGINE THIS CLASS AS THE CLIENT (THE MAIN CLASS)
// EACH ACTIVITY IS REPRESENTED BY A GROUP OF MVC'S
//
// IMPORTANT: USES THE CONTROLLER TO DELEGATE EVERYTHING. 
// IT DOESN'T CARE ABOUT THE IMPLEMENTATION.
//
public class CalculatorActivity extends Activity {
    
    protected CalculatorController controller;
    @Override
    protected void onCreate(Bundle savedInstanceState) {
        super.onCreate(savedInstanceState);
        setContentView(R.layout.activity_main);
        
        // MVC - APPLIED IN THE PRACTISE
        controller = new CalculatorController(new CalculatorModel(), new CalculatorView(this));
    }
    
    @Override
    protected void onActivityResult(int requestCode, int resultCode, Intent data) {
        // THIS IS JUST AN EXAMPLE, BUT YOU MAY DELEGATE THINGS ON:
        // onPause(), onResume(), onWhatEverYouNeed() ...
        //
        controller.updateView();
        controller.updateDb();
    }
}

Conclusions 

I found this way so nice and so clear, that i'm using it in my projects with a lot of possitive feedbacks. Maintenance has become a lot more easier and adding new features has also become a lot more clear and faster. Of course thats not the final approach. I did it that way here to make it simple and to show the idea and advantages behind it. In the final approach i have a defined a abstract model like this: public abstract class MvcModel implements Serializable..., an abstract generic Controller public abstract class MvcController< V extends MvcView, M extends MvcModel > extends Observable implements OnClickListener..., and an abstract view public abstract class MvcView.... Each of them contains a lot of utilities in it, making it simplier to me to implent my projects. So it is up to you to improve it and make it reusable for you. In fact i have created a lib project which i've placed all of those concepts i use.

Thats all. Hope you like it.

😱👇 PROMOTIONAL DISCOUNT: BOOKS AND IPODS PRO ðŸ˜±ðŸ‘‡

Be sure to read, it will change your life!
Show your work by Austin Kleonhttps://amzn.to/34NVmwx

This book is a must read - it will put you in another level! (Expert)
Agile Software Development, Principles, Patterns, and Practiceshttps://amzn.to/30WQSm2

Write cleaner code and stand out!
Clean Code - A Handbook of Agile Software Craftsmanship: https://amzn.to/33RvaSv

This book is very practical, straightforward and to the point! Worth every penny!
Kotlin for Android App Development (Developer's Library): https://amzn.to/33VZ6gp

Needless to say, these are top right?
Apple AirPods Pro: https://amzn.to/2GOICxy

😱👆 PROMOTIONAL DISCOUNT: BOOKS AND IPODS PRO ðŸ˜±ðŸ‘†

Friday, December 20, 2013

Generics vs. AndroidAnnotations Android

Hi there!

In the last post i've shown the advantages of AndroidAnnotations against the tratidional instantiation way from Androd using castings while using the method findById(). AndroidAnnotatations are fine, but if for some reason (additional depencency, License or somethign else) you can't use it, there is an alternative to it. Generics solves this problem in my opinion also very elegant.

Pre-Conditions

Do the steps of post AndroidAnnotations and come back to this post when you are done.

BaseActivity with generics

Create the following class in your sample project (Attention: for some reason i don't know, while inserting code snippets here, generic types are not displayed correctly. For this reason i copied the generics like a String "T extends View". Please remove the Strings from it after copying):

import android.app.Activity;
import android.view.MotionEvent;
import android.view.View;
import android.view.View.OnClickListener;
import android.view.View.OnLongClickListener;
import android.view.View.OnTouchListener;

@SuppressWarnings("unchecked")
public class BaseActivity extends Activity {

    /**
     * Convenience method. Does exactly the same as {@link BaseActivity#initById(Class, int)}
     * @param safetyCheck the class type to be returned
     * @param id the defined R.id... in the layout xml file
     * @return a reference of the specified class type.
     */
    public <"T extends View"> T getReferenceById(Class safetyCheck, final int id) {
        return initById(safetyCheck, id);
    }

    /**
     * Initializes views over id's.
     * @param safetyCheck the class type to be returned
     * @param id the defined R.id... in the layout xml file
     * @return a reference of the specified class type.
     */
    public <"T extends View"> T initById(Class safetyCheck, final int id) {
        return (T) findViewById(id);
    }

    /**
     * Initializes views over id's with onClickListeners.
     * @param id the defined R.id... in the layout xml file
     * @param callback a concrete implementation of {@link OnClickCallback}
     * @return a reference of the specified class type in {@link OnClickCallback}.
     */
    public <"T extends View"> T initWithListener(final int id, final OnClickCallback callback) {
        T type = (T) findViewById(id);
        type.setOnClickListener(new OnClickListener() {
            @Override
            public void onClick(View view) {
                callback.onClickPerformed((T) view);
            }
        });
        return type;
    }

    /**
     * Initializes views over id's with onTouchListeners.
     * @param id the defined R.id... in the layout xml file
     * @param callback a concrete implementation of {@link OnTouchCallback}
     * @return a reference of the specified class type in {@link OnTouchCallback}.
     */
    public <"T extends View"> T initWithListener(final int id, final OnTouchCallback callback) {
        T type = (T) findViewById(id);
        type.setOnTouchListener(new OnTouchListener() {
            @Override
            public boolean onTouch(View view, MotionEvent event) {
                return callback.onTouchPerfomed((T) view, event);
            }

        });
        return type;
    }

    /**
     * Initializes views over id's with onLongClickListeners.
     * @param id the defined R.id... in the layout xml file
     * @param callback a concrete implementation of {@link OnLongClickCallback}
     * @return a reference of the specified class type in {@link OnLongClickCallback}.
     */
    public <"T extends View"> T initWithListener(final int id, final OnLongClickCallback callback) {
        T type = (T) findViewById(id);
        type.setOnLongClickListener(new OnLongClickListener() {
            @Override
            public boolean onLongClick(View view) {
                return callback.onLongClickPerformed((T) view);
            }
        });
        return type;
    }

    /**
     * Implement this interface and add an instance of it to the method
     * {@link BaseActivity#initWithListener(int, Callback)} while initializing your components
     * (Views)
     * @author Ricardo Ferreira
     * @since 20/12/2013
     * @version 1.0
     */
    public interface OnClickCallback<"T extends View"> {
        void onClickPerformed(T view);
    }
    /**
     * Implement this interface and add an instance of it to the method
     * {@link BaseActivity#initWithListener(int, Callback)} while initializing your components
     * (Views)
     * @author Ricardo Ferreira
     * @since 20/12/2013
     * @version 1.0
     */
    public interface OnLongClickCallback<"T extends View"> {
        boolean onLongClickPerformed(T view);
    }
    /**
     * Implement this interface and add an instance of it to the method
     * {@link BaseActivity#initWithListener(int, Callback)} while initializing your components
     * (Views)
     * @author Ricardo Ferreira
     * @since 20/12/2013
     * @version 1.0
     */
    public interface OnTouchCallback<"T extends View"> {
        boolean onTouchPerfomed(T view, MotionEvent event);
    }

}


Modify your MainActivity

Copy paste the next code segment into your MainActiviy. (Attention: for some reason i don't know, while inserting code snippets here, generic types are not displayed correctly. For this reason i copied the generics like a String "T extends View". Please remove the Strings from it after copying):

import android.os.Bundle;
import android.widget.Button;
import android.widget.TextView;
import android.widget.Toast;

public class MainActivity extends BaseActivity {

    private OnClickCallback<"Button"> btnClickCallback = new ButtonClickCallback();

    @Override
    protected void onCreate(Bundle savedInstanceState) {
        super.onCreate(savedInstanceState);
        setContentView(R.layout.activity_main);

        initById(TextView.class, R.id.textView1);
        initWithListener(R.id.button1, btnClickCallback);
        initWithListener(R.id.button2, btnClickCallback);
        initWithListener(R.id.button3, btnClickCallback);
        initWithListener(R.id.button4, btnClickCallback);
        initWithListener(R.id.button5, btnClickCallback);
        initWithListener(R.id.button6, btnClickCallback);
        initWithListener(R.id.button7, btnClickCallback);
        initWithListener(R.id.button8, btnClickCallback);
        initWithListener(R.id.button9, btnClickCallback);
        initWithListener(R.id.button10, btnClickCallback);
        initWithListener(R.id.button11, btnClickCallback);
        initWithListener(R.id.button12, btnClickCallback);
        initWithListener(R.id.button13, btnClickCallback);
        initWithListener(R.id.button14, btnClickCallback);
        initWithListener(R.id.button15, btnClickCallback);

    }

    private class ButtonClickCallback implements OnClickCallback<"Button"> {
        @Override
        public void onClickPerformed(Button type) {
            switch (type.getId()) {
            case R.id.button1:
                // returns a Button... do something useful with... if you need to...
                getReferenceById(Button.class, R.id.button1); 
                handleClick();
                break;
            case R.id.textView1:
                // returns a TextView... do something useful with... if you need to...
                getReferenceById(TextView.class, R.id.textView1); 
                handleClick();
                break;
            default:
                handleClick();
                break;
            }
        }
    }

    private void handleClick() {
        Toast.makeText(this, "Generics are even cooler!", Toast.LENGTH_SHORT).show();
    }

}


That's all. Hope you like it.

😱👇 PROMOTIONAL DISCOUNT: BOOKS AND IPODS PRO ðŸ˜±ðŸ‘‡

Be sure to read, it will change your life!
Show your work by Austin Kleonhttps://amzn.to/34NVmwx

This book is a must read - it will put you in another level! (Expert)
Agile Software Development, Principles, Patterns, and Practiceshttps://amzn.to/30WQSm2

Write cleaner code and stand out!
Clean Code - A Handbook of Agile Software Craftsmanship: https://amzn.to/33RvaSv

This book is very practical, straightforward and to the point! Worth every penny!
Kotlin for Android App Development (Developer's Library): https://amzn.to/33VZ6gp

Needless to say, these are top right?
Apple AirPods Pro: https://amzn.to/2GOICxy

😱👆 PROMOTIONAL DISCOUNT: BOOKS AND IPODS PRO ðŸ˜±ðŸ‘†