Friday, December 28, 2012

First PhoneGap App with Android using Eclipse Step by Step on Windows

Hi there! Today i'm gonna show you, how to create your first PhoneGap App with Android using Eclipse on Windows in a few minutes. While searching the web for a "Hello World Project" i found a lot of posts but no one had a good quality or was detailed enough, so anyone could understand it if starting by zero.

So i'm trying to simplify this process as much as possible and give this know how further to you all. Pre-requisite is that you have read and done all the steps from the post: How to install PhoneGap on Windows. So i'll assume you have done those steps and are ready to start. 

ATTENTION: In this post we are gonna see a PhoneGap Project (with plain javascript).
If you are looking for an Android App Project (with plain Java) so go to: First Android App Step by Step

We will learn how to:
  • download and install PhoneGap
  • create a new Android App Project
  • change the project from Java to Javascript
  • prepare the Activity-Class to work with PhoneGap
  • create a simple index.html file to run on the App
  • prepare the Manifest-file before running it
  • to run the App
  • shortcut all those steps

Download and install PhoneGap

Go to PhoneGap and download the newst version of it and unzip it in any place you want. (at the time i wrote this post it was PhoneGap 2.2.0) I recommend to unzip it in the development directory C:\development as described in the post How to install PhoneGap on Windows. You should see a structure like this bellow.


So before going ahead lets do some changes here. Select the folder phonegap-phonegap-8a3aa47 and press Ctrl+X, go into C\development and paste it here with Ctrl+V and rename it to phonegap-2.2.0 so that you have the new structure as shown bellow. After that delete the empty folder called: phonegap-phonegap-2.2.0-0-g8a3aa47.

Creating a new Android App Project

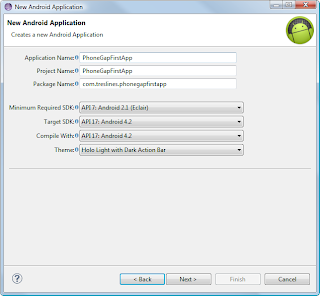
Ok, now lets create a normal Android App Project first before comming back to this new PhoneGap structure. Start Eclipse if not already running and press Ctrl+N to start the project wizard and create a new project like that: (See picture sequence bellow and don't worry about the details at this point. As soon as we get further we will understand it.)


Thats the result if everything goes fine. At this point this App is still a plain java project. We will change it now to a PhoneGap App in a few minutes. Don't worry about the App name or other properties at this point of the post. We can change everything if we want. Let's keep the focus on the really important setup things we shall know.


Changing the project from Java to Javascript PhoneGap App

First create a new folder called www and a new file called index.html. both in the project folder assets. By me it looks like this:


Ok, that's the interresting part of it. To do this, go back now to the PhoneGap structure we've unzipped in the C:\ directory and look for the android folder in it. By me it looks like C:\development\phonegap-2.2.0\lib\android and then you should see the picture bellow: (locate the points 1) 2) and 3) of it)


Copy now the point 1) 2) and 3) in the project structure the way you see bellow.


Prepare the Activity-Class

Ok we are almost done. Just a few changes before running it. In the eclipse locate the src-folder and open the MainActivity.java class in it and change it that way you'll see bellow: (I leave the comments so you can see what I've changed)

import org.apache.cordova.DroidGap;

import android.os.Bundle;
import android.view.Menu;

public class MainActivity extends /* Activity */DroidGap {

    // @Override
    // protected void onCreate(Bundle savedInstanceState) {
    // super.onCreate(savedInstanceState);
    // setContentView(R.layout.activity_main);
    // }

    @Override
    public void onCreate(Bundle savedInstanceState) {
        super.onCreate(savedInstanceState);
        super.loadUrl("file:///android_asset/www/index.html");
    }

    @Override
    public boolean onCreateOptionsMenu(Menu menu) {
        // Inflate the menu; this adds items to the action bar if it is present.
        getMenuInflater().inflate(R.menu.activity_main, menu);
        return true;
    }

} 

Content of Index.html

Ok now copy paste this HTML-Code into the index.html file we've created in the assets-folder.
<!DOCTYPE HTML>
<html>
  <head>
    <title>First App</title>
  <script src="cordova-2.2.0.js"></script>
  <script>
     function onLoad(){
          document.addEventListener("deviceready", onDeviceReady, true);
     }
     function onDeviceReady(){ navigator.notification.alert("PhoneGap is working!!");
     }
  </script>
  </head>
  <body onload="onLoad();">
       <h1>Welcome to PhoneGap</h1>
       <h2>Edit assets/www/index.html</h2>
  </body>
</html>

Prepare the Manifest-File before launching

In the manifest file called AndroidManifest.xml make sure you have inserted the following code in it:(Tip: in order to not do it all by hand, look at C:\development\phonegap-2.2.0\lib\android\example\AndroidManifest.xml and copy/paste it from there.)

Running the App

Select your MainActivity.java file and run it as Android application. (make sure you've an AVD installed as we have seen in the post How to install PhoneGap on Windows) If everything goes well you'll see that picture bellow. Thats all. From here you can now develop your app further.


Setup-Shortcut for the Developers under us

Ok there is a even better way to do this.(I've shown all steps first so we do not overwhelm us with to much stoff)  Delete the folder www in the eclipse project. Then look into PhoneGap directory C:\development\phonegap-2.2.0\lib\android\example\assets There you'll encounter a sample structure. Just copy it into assets folder like i did bellow instead of doing it by hand. It should look like this if you run it:


Another good short-cut the youtube video PhoneGap Android Tutorial.
That's all. Now let's develop some "real" PhoneGap Apps. ;-)) Have fun!


😱👇 PROMOTIONAL DISCOUNT: BOOKS AND IPODS PRO ðŸ˜±ðŸ‘‡

Be sure to read, it will change your life!
Show your work by Austin Kleonhttps://amzn.to/34NVmwx

This book is a must read - it will put you in another level! (Expert)
Agile Software Development, Principles, Patterns, and Practiceshttps://amzn.to/30WQSm2

Write cleaner code and stand out!
Clean Code - A Handbook of Agile Software Craftsmanship: https://amzn.to/33RvaSv

This book is very practical, straightforward and to the point! Worth every penny!
Kotlin for Android App Development (Developer's Library): https://amzn.to/33VZ6gp

Needless to say, these are top right?
Apple AirPods Pro: https://amzn.to/2GOICxy

😱👆 PROMOTIONAL DISCOUNT: BOOKS AND IPODS PRO ðŸ˜±ðŸ‘†

Wednesday, December 12, 2012

First Android App Step by Step

Hi there! I've started programming Android Apps a few days ago and i had some problems while getting started with. Prerequisite for going ahead with this blog, is the post How to install phonegap for android. So i assume you've read and done all the steps in it first.

In this post here i wanna show you the project structure and ideias behind it, so you understand what is important to know and what can be learned by doing. I lost a lot of time by myself finding out why i need this or that. The idea is to pass this know-how ahead to you, encouraging you to start with without frustration, like i had. ;-)

The base for this post was the contribution from Lars Vogel at Android Development Tutorial which is very detailed but unfortunately didn't work for me. So i adapted the example there to this post here. While there is a lot of good information, i'm focusing here on the needs of a developer which is looking for rapid quickwins and successful experiences. A good reference for widgets is the Guide for developers from android

In this post we will learn how to:
  • understand the project structure
  • use externalized strings
  • layout a simple app with graphical layout and main.xml using textfield, radiobutton and button
  • associate actionListener to the widgets
  • build and run a simple app step by step

Result: At the end of this post we will have a little app like that (a simple temperatur converter):

Emulator Galaxy Nexus - API 16 - Android 4.1.2

Understanding the project structure

OK, let's start. If you've followed the steps in my recent post called:  How to install phonegap for android you should have a project already in your eclipse workpace. In my case my project's name is com.treslines.play.Play. It looks like that:


As we can see, i've highlighted the most important classes in the android project structure we must know and understand to go on without big problems. In my case above the class Play.java is the place in which i will code my Apps' logic as we will see later. (add Listener to buttons, handle user actions and so on...) Further we have in the package gen the class R.java (This is a Resource class) This class is autogenerated and you should not do anything here. Everytime you add a widget like a button, textfield, layout and so on to your app (we will see how to do it later on), eclipse will automatically generate a resource id for you and store it in this class. this is good to know at the beginning because you'll see this class a lot of time when programming your App's logic later. By me it looks like that bellow: (again don't worry if it looks different by you at this point of the post. It will look like that once we have done all steps in this post) I'm showing it to you, so you can familiarize yourself with.


As you can see, there is a lot of public final classes with public static id's. Thats the way an android app references and identifies its widgets as we will see while programming our logic later. That's important to know. Ok let's go ahead.

Use externalized Strings

The next step ist the file strings.xml. That's the place where we define externalized strings (labels) and placeholders for our app. The file strings.xml has two practical views. Resources ans strings.xml. In my case i've defined 5 string properties over the Resource view. Let's do it step by step. Look for the file strings.xml in the package res/values/strings.xml. (it should already be there)


Follow the steps above and add 5 new String properties like that:
Name: app_name, Value: Temperatur Converter
Name: myColor, Value: #000000
Name: celcius, Value: to Celcius
Name: fahrenheit, Value: to Fahrenheit
Name: calc, Value: Calculate

Ok, now if you change the view from Resource to strings.xml you should see something like that:


As you can see, you could also define your strings that way. It is up to you which way fits better to you. i like the Resource view because i have to type less then in the strimgs.xml file itself. ;-)

Layout a simple App

OK great. Now let's come to the cool part of the App. The design! Go ahead and look for the main.xml. That's the file in which we design the App. This file is located in the package called: res/layout/main.xml. (it should already be there) Like strings.xml we can design our app either on the Graphical Layout or directly main.xml file. In my case it looks like that bellow (don't worry if it looks different by you at this point of the post. It will look like that once we have done all steps in this post )


First of all we must define an emulator, setup a phone type and the version of the API you expect to use. Let's do it step by step. Let's define an emulator first. follow the steps bellows an press OK after step 3.


Ok! almost finished! Let's define now the phone type and the Android API version you want. In my case i choose Galaxy Nexus and API 16 Android: 4.1.2. It is up to you to choose whatever you want.


Ok done! Now in order to save time, and because I know you can not wait to see your app ;-) change from Graphical layout to main.xml and past this code in it. (of course you could do it by hand by drag'n'drop any widget from the palette on the left side) But in order to show you another way and to encourage you to look inside of it, i prefere to do it that way. ;-) copy the code bellow and put it into you main.xml file and save it. now you should see the same view like a do. (temperatur converter)


<?xml version="1.0" encoding="utf-8"?>
<RelativeLayout xmlns:android="http://schemas.android.com/apk/res/android"
    xmlns:tools="http://schemas.android.com/tools"
    android:layout_width="wrap_content"
    android:layout_height="wrap_content"
    android:background="@color/myColor" >

    <EditText
        android:id="@+id/editText1"
        android:layout_width="wrap_content"
        android:layout_height="wrap_content"
        android:layout_alignParentLeft="true"
        android:layout_alignParentTop="true"
        android:ems="10"
        android:inputType="numberSigned|numberDecimal"
         >
        <requestFocus />
    </EditText>

    <RadioGroup
        android:id="@+id/radioGroup1"
        android:layout_width="wrap_content"
        android:layout_height="wrap_content"
        android:layout_alignParentLeft="true"
        android:layout_below="@+id/editText1" >

        <RadioButton
            android:id="@+id/radio0"
            android:layout_width="wrap_content"
            android:layout_height="wrap_content"
            android:checked="true"
            android:text="@string/celsius" />

        <RadioButton
            android:id="@+id/radio1"
            android:layout_width="wrap_content"
            android:layout_height="wrap_content"
            android:text="@string/fahrenheit" />
    </RadioGroup>

    <Button
        android:id="@+id/button1"
        android:layout_width="wrap_content"
        android:layout_height="wrap_content"
        android:layout_alignParentLeft="true"
        android:layout_below="@+id/radioGroup1"
        android:text="@string/calc" />

</RelativeLayout>  

OK now i wanna show you how to set the externalized strings to you widgets without writing it by hand in the main.xml file. Go ahead and change back to the Graphical Layout view > select the calculate button > right mouse click on it > edit text... > choose the string calc from the options > OK > done! Cool right! That's a very cool way to set the strings to you widgets without having to edit the main.xml by hand.


try to get familiarized with playing around, looking into those files: R.java, strings.xml, main.xml, Graphical Layout and Resource tabs.

Associating Listener to widgets and programming the logic

Ok, now it is time to do the last step programming our logic for the Temperatur Converter. In order to save time copy the code bellow and paste it in your class which extends from the class Activity. In my case it is the class Play. Try to understand it. The code should be very expressive. If you have already some expirience programming GUI you'll have no problem to understand it. I first init all variables in the method onCreate(), then i program the logic in the method onButtonPressed(). Pay attention to the references to the class R.java we have seen at the beginning of this post. It should be very familiar to you now.

import android.app.Activity;
import android.os.Bundle;
import android.view.View;
import android.widget.Button;
import android.widget.EditText;
import android.widget.RadioButton;
import android.widget.Toast;

public class Play extends Activity

{
    private EditText inputField;
    private Button calculateButton;
    private RadioButton celsiusRadioButton;
    private RadioButton fahrenheitRadioButton;

    /** Called when the activity is first created. */
    @Override
    public void onCreate(Bundle savedInstanceState) {
        super.onCreate(savedInstanceState);
        setContentView(R.layout.main);
        initInputFieldById();
        initCalculateButtonById();
        initCelciusRadioButtonById();
        initFahrenheitRadioButtonById();
        initInteractions();
    }

    private void initCelciusRadioButtonById() {
        celsiusRadioButton = (RadioButton) findViewById(R.id.radio0);
    }

    private void initFahrenheitRadioButtonById() {
        fahrenheitRadioButton = (RadioButton) findViewById(R.id.radio1);
    }

    private void initInputFieldById() {
        inputField = (EditText) findViewById(R.id.editText1);
    }

    private void initCalculateButtonById() {
        calculateButton = (Button) findViewById(R.id.button1);
    }

    private void initInteractions() {
        calculateButton.setOnClickListener(new View.OnClickListener() {
            public void onClick(View v) {
                onButtonPressend(v);
            }
        });
    }

    private void onButtonPressend(View view) {
        final int calculateButtonId = R.id.button1;
        final int selectedWidgetId = view.getId();
        
        switch (selectedWidgetId) {
            
            case calculateButtonId:
                if(isInputFieldEmpty()){
                    return;//exit without calculation
                }
                showResultToUser(celsiusRadioButton.isChecked());
                swapRadioButtonState(celsiusRadioButton.isChecked());
                break;
            }
    }
    
    private void showResultToUser(boolean toCelcius){
        if(toCelcius){
            inputField.setText(String.valueOf(convertFahrenheitToCelsius(parseValueFromInputField())));
        }else{
            inputField.setText(String.valueOf(convertCelsiusToFahrenheit(parseValueFromInputField())));
        }
    }
    
    private void swapRadioButtonState(boolean isCelcius){
        if(isCelcius){
            celsiusRadioButton.setChecked(false);
            fahrenheitRadioButton.setChecked(true);
        }else{
            celsiusRadioButton.setChecked(true);
            fahrenheitRadioButton.setChecked(false);
        }
    }
    
    private boolean isInputFieldEmpty(){
        if (inputField.getText().length() == 0) {
            showMessageOnEmptyInputField();
            return true;
        }return false;
    }
    
    private void showMessageOnEmptyInputField(){
        Toast.makeText(this, "Please enter a valid number",Toast.LENGTH_LONG).show();
    }
    
    private float parseValueFromInputField(){
        return Float.parseFloat(inputField.getText().toString());
    }
    

    private float convertFahrenheitToCelsius(float fahrenheit) {
        return ((fahrenheit - 32) * 5 / 9);
    }

    private float convertCelsiusToFahrenheit(float celsius) {
        return ((celsius * 9) / 5) + 32;
    }

}

Run the App

Lets take the final step. We can run the app now either in the debugg modus or as a normal java application. go ahead an run it the way you want. (it may take several minutes depending on the processor of your PC and resources you have) If everything went well, you should see something like that:


😱👇 PROMOTIONAL DISCOUNT: BOOKS AND IPODS PRO ðŸ˜±ðŸ‘‡

Be sure to read, it will change your life!
Show your work by Austin Kleonhttps://amzn.to/34NVmwx

This book is a must read - it will put you in another level! (Expert)
Agile Software Development, Principles, Patterns, and Practiceshttps://amzn.to/30WQSm2

Write cleaner code and stand out!
Clean Code - A Handbook of Agile Software Craftsmanship: https://amzn.to/33RvaSv

This book is very practical, straightforward and to the point! Worth every penny!
Kotlin for Android App Development (Developer's Library): https://amzn.to/33VZ6gp

Needless to say, these are top right?
Apple AirPods Pro: https://amzn.to/2GOICxy

😱👆 PROMOTIONAL DISCOUNT: BOOKS AND IPODS PRO ðŸ˜±ðŸ‘†