Saturday, October 13, 2012

How to configure Jboss 7 - The Essence of JBoss AS 7

How to use and configure JBoss AS 7 on Windows Vista?

Hi there! in this post i wanna share with you some of the new features of JBoss 7. Our company works since years with JBoss (Versions 5, 6 and going to upgrade to 7) As a client developer i didn't have much chance to explore and understand JBoss in deep and details. That's the reason i am diving into the JBoss world extending my know-how a little bit. The books i read are all heavy weights. So i tried to extract the essence of it, making it easy for you and me to get started with and to have a source to look for, when trying to do more specific things with. I will not show or discuss to many architectual designs in deep and things like that. If you are looking for architectual designs in deep, i recommend the book from Francesco Marchioni called: JBoss AS7 Configuration, Deployment and Administration. In this first post, we will see how to install JBoss 7 on windows vista and how to install the JBoss tools with Eclipse as an IDE.

Getting started: Installing the environment. We will do it, step by step don't worry.

  • you'll need the Java Development Kit where JBoss 7 will be running
  • you'll need to install JBoss 7
  • you'll need to install an IDE. In this case eclipse is the best for me.  

Downloading and installing the JDK

go to: Java Development Kit JDK and download the JDK the fits to your PC-Hardware (34Bit or 64Bit)
In my case i'll take the 32bit version: jdk-7u7-windows-i586.exe 


Tip: To find out if your PC is a 32 or 64Bit maschine, do that on windows vista for example: go to: system configuration>system>show. Take a look at this picture bellow:


Attention: As soon as you double click the installer, make sure you define an installation path that do not contain empty spaces. Usually windows will propose you to isnstall the JDK in C:\Program Files. This leads to some issues when you are referencing the core libraries. A better installation path would be C:\Software\Java or even simplier and better C:\Java.

Updating the settings of you PC after the installation of the JDK

The most important setting is the JAVA_HOME environment variable. JBoss is referenced to it. So lets configure this path. I am using windows vista. So i looks like this:(Tip: You must be logged as admin to change the environment variable)


Ok, now we need to add the JAVA_HOME to the systems PATH. The system path PATH is already in your list. Select it and click on edit. At the end of the file write that to it: %JAVA_HOME%\bin
You PC knows yet where the JDK is located and we are ready to go to the next step.

Downloading and installing JBoss AS7

go to: JBoss AS 7 and download JBoss for free. I will take the version jboss-as-7.1.1.Final.zip.

 
Note that Jboss does not have an installer. You simply unzip it in the directory you want. You may unzip it like this: C:\Software\JBoss. After that locate the folder called bin and start the command-console (cmd.exe) from here. We wanna test if the installed JBoss server works properly with our new installed JDK first, before we go on. Tip: To start the cmd.exe directly on you bin folder do that simple trick: Locate the bin folder of your JBoss installation, press and hold Shift, then perform with your mouse a right mouse click on the bin folder and select start command prompt from here. It could looks like this:


How to start JBoss?

Then type the new command standalone.bat and press enter in the cmd prompt.


This is the equivalent run.bat command in the older versions of JBoss. Per default JBoss will start with the default configurations like 64MB of heap as a minimum and 512MB as a maximum. Don't worry about it now. We will see how to change this later on this example. Open a browser of your choice now and type: http://localhost:8080 in it and hit enter. (that's the address of your installed JBoss server) you should see now the welcome page of JBoss AS7. Note: I don't know why, but if you type the server's address (http://localhost:8080) in Firefox for example and if you get an error like: This address is not valid or any other error. Close the tab and open a new tab and try it again first, before searching for installation errors. Try it on another browser as well. In my case, typing the server's address in firefox leads to an error. In Chrome it works just fine. After closing and opening a new tab in firebox it just works fine as well.

So we are done with the installation. Lets explore the new features from JBoss AS 7 from the command line before installing our IDE.

New Command Line Interface (CLI) with autocomplete function

locate the bin folder in your JBOSS_HOME (in my case it is C:\JBoss\jboss-as-7.1.1.Final\bin) and doble click the command jboss-cli.bat. you'll get a cmd-prompt like that bellow. type the command connect to connect to you running Jboss-Server.


This shell (command-prompt) is very smart and is able to autocomplete commands by hiting the key Tab when typing the first letters of a command. If you type for example the letter "s" and hit tab the shell will propose the command shutdown. That's very nice and confortable.

How can i stop JBoss?

To stop a running jboss server you can either type Ctrl+C or you can type the command :shutdown to issue an immediate stop.

How to stop Jboss over a script file?

If you wanna stop the server from a script file without the smart shell you can pass an option to the jboss-cli.bat command like this: jboss-cli.bat --connect command=:shutdown

How to stop a remote JBoss?

If you wanna stop a remote Jboss server to that on your Command Line Interface (CLI)
connect with the remote server typing its address. for example: connect 192.168.1.10
then execute the shutdown command like this: :shutdown

Installing Eclipse as an IDE (Integrated Development Environment)

Eclipse is currently an IDE that supports the most features for JBoss. It has a lot of useful plugins and extentions, it is also Java based and full compatible. go to: Eclipse here we will download the latest enterprise editon available.

Unzip the donwload eclipse file like Jboss in a directory of your choice. I recommend something like this: C:\eclipse. Locate in your ECLIPSE_HOME the folder eclipse (in my case it is: C:\eclipse\eclipse-jee-juno-SR1 because i've renamed the second eclipse folder to the downloaded file name) and double click the command eclipse.exe to start eclipse.


Eclipse will as you for a working place. This is nothing else then a folder of your choice in which your projects will be saved in. Attention: I recommend to place your workspace in your USER_HOME directory to avoid problems with your anti-virus program. In my case it is (C:\Users\Ricardo\ws_jboss)


How to install the Jboss tools on Eclipse

go to: Help > Install new software then hit the button add and type http://download.jboss.org/jbosstools/updates/development/juno/ in it. After that follow the screen sequences:


Making Jboss ready for Eclipse

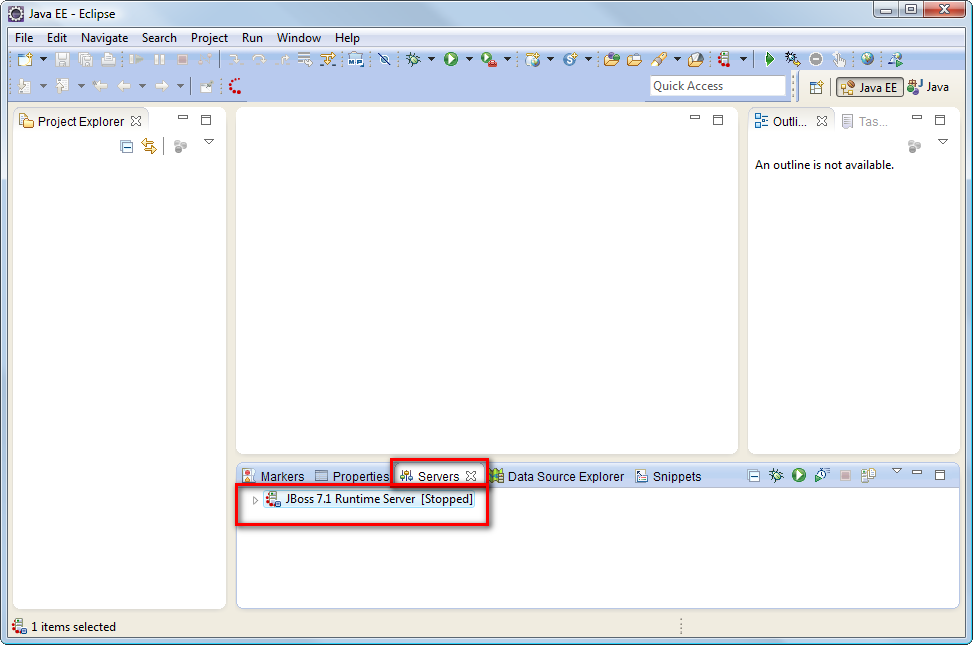
Now you should be able to choose a new server by doing this: Ctrl+N and follow the screen sequences (Note: you may must specify your JBOSS_HOME directory in picture JBoss Runtime. In my case it was: C:\JBoss\jboss-as-7.1.1.Final):


Next post series coming soon... 

😱👇 PROMOTIONAL DISCOUNT: BOOKS AND IPODS PRO ðŸ˜±ðŸ‘‡

Be sure to read, it will change your life!
Show your work by Austin Kleonhttps://amzn.to/34NVmwx

This book is a must read - it will put you in another level! (Expert)
Agile Software Development, Principles, Patterns, and Practiceshttps://amzn.to/30WQSm2

Write cleaner code and stand out!
Clean Code - A Handbook of Agile Software Craftsmanship: https://amzn.to/33RvaSv

This book is very practical, straightforward and to the point! Worth every penny!
Kotlin for Android App Development (Developer's Library): https://amzn.to/33VZ6gp

Needless to say, these are top right?
Apple AirPods Pro: https://amzn.to/2GOICxy

😱👆 PROMOTIONAL DISCOUNT: BOOKS AND IPODS PRO ðŸ˜±ðŸ‘†

Saturday, March 17, 2012

Making beans/data reusable and simultaneously reducing class size to only one method

Hi there! Today i wanna share an idea with you (generic bean/Data)

If there is one thing a hate is to write beans, getter and setters again, again and again. I was searching for a solution on how to make beans reusable and classes more readable, smaller and cleaner. A typical or common situation is when you need domain objects. I've caught myself constantly writting the "same  boring code" again and again. So i decided to search for a solution, which could help me saving time. I had an idea, which i would like to share with you. I've called it: "GenericBean".

IMPORTANT: After listening to the feedbacks from other developers I decided to let this post alive just to show to you, why this approach is not recommend and shall not be used. Stay with POJO's. 

Let's say we have a database table called "address". This address table may contain following attributes:
  • ID
  • FIRST_NAME
  • SECOND_NAME
  • STREET
  • HOUSE_NUMBER
  • ZIP_CODE
  • LAND
Let's say now, we need a domain class called: SimpleDomainAddress. The normal way would be to do something like this:

public class SimpleDomainAddress {
 
 private double addressId;
 private String firstName;
 private String secondName;
 private String street;
 private int houseNumber;
 private String zipCode;
 private String land;


 public double getAddressId() {
  return this.addressId;
 }

 public void setAddressId( double addressId ) {
  this.addressId = addressId;
 }

 public String getFirstName() {
  return this.firstName;
 }

 public void setFirstName( String firstName ) {
  this.firstName = firstName;
 }

 public String getSecondName() {
  return this.secondName;
 }

 public void setSecondName( String secondName ) {
  this.secondName = secondName;
 }

 public String getStreet() {
  return this.street;
 }

 public void setStreet( String street ) {

  this.street = street;
 }

 public int getHouseNumber() {
  return this.houseNumber;
 }

 public void setHouseNumber( int houseNumber ) {
  this.houseNumber = houseNumber;
 }

 public String getZipCode() {
  return this.zipCode;
 }

 public void setZipCode( String zipCode ) {
  this.zipCode = zipCode;
 }

 public String getLand() {
  return this.land;
 }

 public void setLand( String land ) {
  this.land = land;
 }
}

So this is the way everybody would do i think. Now if you have another domain object you'll do that again and so on generating a lot of unnescessary code lines in my point of view.

Let us hold on to what we do here:
  • We always define new variables
  • We always define new methods
  • We should have added "theoretically" some comments to it. 
The following UML diagram visualizes GenericBean approach:
 

Null Object
First of all we define a NULL object that could be written like this:

public class Null {
 // NullObject
}

GenericBean
Then we write the generic bean. This bean could be bigger then the example here. This is only a show case to visualize the idea behind it. I will intentionally violate some code conventions by writting variables very short and beginning with an underscore following by a number. I'll explain later why I am doing this way.

public class GenericBean<A, B, C, D, E, F, G, H, I, J> {
 private A _0;
 private B _1;
 private C _2;
 private D _3;
 private E _4;
 private F _5;
 private G _6;
 private H _7;
 private I _8;
 private J _9;

 public A get_0() {
  return this._0;
 }
 
 public void set_0( A _0 ) {
  this._0 = _0;
 }

 public B get_1() {
  return this._1;
 }

 public void set_1( B _1 ) {
  this._1 = _1;
 }

 public C get_2() {
  return this._2;
 }

 public void set_2( C _2 ) {
  this._2 = _2;
 }

 public D get_3() {
  return this._3;
 }

 public void set_3( D _3 ) {
  this._3 = _3;
 }

 public E get_4() {
  return this._4;
 }

 public void set_4( E _4 ) {
  this._4 = _4;
 }

 public F get_5() {
  return this._5;
 }

 public void set_5( F _5 ) {
  this._5 = _5;
 }

 public G get_6() {
  return this._6;
 }

 public void set_6( G _6 ) {
  this._6 = _6;
 }

 public H get_7() {
  return this._7;
 }

 public void set_7( H _7 ) {
  this._7 = _7;
 }

 public I get_8() {
  return this._8;
 }

 public void set_8( I _8 ) {
  this._8 = _8;
 }

 public J get_9() {
  return this._9;
 }

 public void set_9( J _9 ) {
  this._9 = _9;
 }
}

Shriking to only one method
Ok, at this point we have no profit of it right? Let's write know the same class SimpleDomainAddress again, but now using the GenericBean and Null Object.

public class SimpleDomainAddress {
 
 private GenericBean<Double, String, String, String, Integer, String, String, Null, Null, Null> genericBean;

 public SimpleDomainAddress() {
/** 
Database table: Id, Firstname, Secondname, Street, HouseNumber, Zipcode, Land
(The last 3 entries doesn't exit in the database, so we set our generic bean to Null)
*/
  this.genericBean = new GenericBean<Double, String, String, String, Integer, String, String, Null, Null, Null>();
 }

 /**
  * This generic bean represents the database table. 
  * See bellow how to get and set the values from it.
  * <ul>
  * <li>get_0 <b>return</b> AddressId</li>
  * <li>get_1 <b>return</b> Firstname</li>
  * <li>get_2 <b>return</b> Secondname</li>
  * <li>get_3 <b>return</b> Street</li>
  * <li>get_4 <b>return</b> HouseNumber</li>
  * <li>get_5 <b>return</b> Zipcode</li>
  * <li>get_6 <b>return</b> Land</li>
  * <li>get_7 Null (not used)</li>
  * <li>get_8 Null (not used)</li>
  * <li>get_9 Null (not used)</li>
  * </ul>
  */
 public GenericBean<Double, String, String, String, Integer, String, String, Null, Null, Null> getGenericBean() {
  return this.genericBean;
 }
}

Good side effects:
  • With this approach, the class is shrinking to less than a few lines of code.
  • A good side effect is the comment that is gaining in importance and now is no longer redundant.
  • If we notice that the database needs to be expanded, we only need to replace a NULL entry with the new value and we're done. 
  • Easy to learn (this example says all), simple, reusable.
  • We always know which entry is the first and the last in the database (get_1 & get_6 in this example)
The reason why i wrote the variables like "_0", _1" and so on is that this way, when i type "get" or "set" in my IDE, i'll get the methods in the same order(sequence) as i defined the database fields in my constructor as you can see above. This make the usage in association with the comment more intuitive and powerful.

😱👇 PROMOTIONAL DISCOUNT: BOOKS AND IPODS PRO ðŸ˜±ðŸ‘‡

Be sure to read, it will change your life!
Show your work by Austin Kleonhttps://amzn.to/34NVmwx

This book is a must read - it will put you in another level! (Expert)
Agile Software Development, Principles, Patterns, and Practiceshttps://amzn.to/30WQSm2

Write cleaner code and stand out!
Clean Code - A Handbook of Agile Software Craftsmanship: https://amzn.to/33RvaSv

This book is very practical, straightforward and to the point! Worth every penny!
Kotlin for Android App Development (Developer's Library): https://amzn.to/33VZ6gp

Needless to say, these are top right?
Apple AirPods Pro: https://amzn.to/2GOICxy

😱👆 PROMOTIONAL DISCOUNT: BOOKS AND IPODS PRO ðŸ˜±ðŸ‘†

Monday, March 5, 2012

How to write a singleton? (pros and contras)

A singleton for each situation and the pros and contras of it?


Lazy synchronized initialization

public final class Session 
  {
      private static Session instance;
 
      /** singleton */
      private Session() {}
 
      /** if you do not need synchronisation do not mark it as synchronized */
      public synchronized static Session getInstance() 
      {
          return (instance == null) ? instance = new Session() : instance;
      }
      /** your methods goes here... */
   }


PRO: can be initialized lazy the first time it is used
CONTRA: Singletons shall be avoid because they are hard to test and debug. Futher they contribute to less cohesive designs.


No Lazy initialization needed

public class Session 
  {
    private final static Session INSTANCE = new Session();

    private Session() {}

    public static Session getInstance() 
    { 
      return Session.INSTANCE; 
    }

    protected Object clone() 
    {
      throw new CloneNotSupportedException();
    }

    /** your methods goes here... */
  }

PRO: Immediate allocation of the needed resource
CONTRA: Needs "more" resource as nescessary + CONTRA from first case


No Lazy initialization needed (the elegant, modern way)

public enum Session 
   {
       INSTANCE;
       private int session;

       public int getSession() {
           return ++session;
       }

       /** your methods goes here... */
   }


PRO: Very simple, modern way. Immediate allocation of the needed resource
CONTRA: Needs "more" resource as nescessary + CONTRA from first case


😱👇 PROMOTIONAL DISCOUNT: BOOKS AND IPODS PRO ðŸ˜±ðŸ‘‡

Be sure to read, it will change your life!
Show your work by Austin Kleonhttps://amzn.to/34NVmwx

This book is a must read - it will put you in another level! (Expert)
Agile Software Development, Principles, Patterns, and Practiceshttps://amzn.to/30WQSm2

Write cleaner code and stand out!
Clean Code - A Handbook of Agile Software Craftsmanship: https://amzn.to/33RvaSv

This book is very practical, straightforward and to the point! Worth every penny!
Kotlin for Android App Development (Developer's Library): https://amzn.to/33VZ6gp

Needless to say, these are top right?
Apple AirPods Pro: https://amzn.to/2GOICxy

😱👆 PROMOTIONAL DISCOUNT: BOOKS AND IPODS PRO ðŸ˜±ðŸ‘†

Wednesday, February 29, 2012

How to eliminate If-Statements and InstanceOf with the Visitor-Pattern

Using the visitor pattern to eliminate If-Statements and InstanceOf


We all know the visitor pattern from the book GoF (gang of four) or from other famous books. The examples in there are usually associated with trees or composite structures. I was always searching for real life examples, where this pattern could be used, making software reusable and more readable. During a refactoring task, a collegue of mine had a really good idea, that i want to share with you.


Here is the code fragment from the method we want to refactore. The method has a lot of if-statements and instanceOf in there. It maps contacts to data transfer objects (DTO)


public static void mapKontakte(ContactType contactType, List<ErweiterteKontakt<? extends StringDomainEnum>> kontakte) {
        ch.abraxas.tax.register.registerimport.parser.ech0046.v10.ObjectFactory ech0046Factory =
                new ch.abraxas.tax.register.registerimport.parser.ech0046.v10.ObjectFactory();
        for (ErweiterteKontakt<? extends StringDomainEnum> kontakt : kontakte) {
            if (kontakt instanceof Telefon) {
                PhoneType phoneType = ech0046Factory.createPhoneType();
                phoneType.setPhoneCategory(new BigInteger( ((Telefon) kontakt).getKategorie().key()));
                phoneType.setPhoneNumber(kontakt.getDetail());
                contactType.getPhone().add(phoneType);
            } else if (kontakt instanceof Email) {
                EmailType emailType = ech0046Factory.createEmailType();
                emailType.setEmailCategory(new BigInteger( ((Email) kontakt).getKategorie().key()));
                emailType.setEmailAddress(kontakt.getDetail());
                contactType.getEmail().add(emailType);
            } else if (kontakt instanceof Internet) {
                InternetType internetType = ech0046Factory.createInternetType();
                internetType.setInternetCategory(new BigInteger( ((Internet) kontakt).getKategorie().key()));
                internetType.setInternetAddress(kontakt.getDetail());
                contactType.getInternet().add(internetType);
            }
            // Should we use an else branch to verify that we are mapping all Kontakte?
        }
    }


here is the same method after refactoring:


public static void mapKontakte(ContactType contactType,
   List<ErweiterteKontakt<? extends StringDomainEnum>> kontakte) {

  ErweiterterKontaktVisitor visitor = new BindingObjectFromKontaktVisitor(contactType);
  for (ErweiterteKontakt<? extends StringDomainEnum> kontakt : kontakte) {
   // calls the Kontakt to use the visitor
   kontakt.accept(visitor);
  }
 }


Well here is how to do it. In the abstract class ErweiterteKontakt we define following method:


public abstract void accept(ErweiterterKontaktVisitor visitor);


Then we implement this abstract method in the classes Email, Telefon and Internet. They all extends ErweiterkeKontakt.


 @Override
 public void accept(ErweiterterKontaktVisitor visitor) {
  visitor.visit(this);
 }

Defining the visitor interface


public interface ErweiterterKontaktVisitor {

 /**
  * Visit the telefon
  * 
  * @param telefon
  */
 public void visit(Telefon telefon);

 /**
  * visit the email
  * 
  * @param email
  */
 public void visit(Email email);

 /**
  * visit the internet
  * 
  * @param internet
  */
 public void visit(Internet internet);
}


Then Implementing the Visitor itself:


public class BindingObjectFromKontaktVisitor implements ErweiterterKontaktVisitor {

 private ch.abraxas.tax.register.registerimport.parser.ech0046.v10.ObjectFactory ech0046Factory = new ch.abraxas.tax.register.registerimport.parser.ech0046.v10.ObjectFactory();

 private ContactType contactType;

 /**
  * Konstruktor
  */
 public BindingObjectFromKontaktVisitor(ContactType contactType) {
  this.contactType = contactType;
 }

 /**
  * {@inheritDoc}
  */
 @Override
 public void visit(Telefon telefon) {
  PhoneType phoneType = ech0046Factory.createPhoneType();
  phoneType.setPhoneCategory(new BigInteger(telefon.getKategorie().key()));
  phoneType.setPhoneNumber(telefon.getDetail());
  contactType.getPhone().add(phoneType);
 }

 /**
  * {@inheritDoc}
  */
 @Override
 public void visit(Email email) {
  EmailType emailType = ech0046Factory.createEmailType();
  emailType.setEmailCategory(new BigInteger(email.getKategorie().key()));
  emailType.setEmailAddress(email.getDetail());
  contactType.getEmail().add(emailType);

 }

 /**
  * {@inheritDoc}
  */
 @Override
 public void visit(Internet internet) {
  InternetType internetType = ech0046Factory.createInternetType();
  internetType.setInternetCategory(new BigInteger((internet).getKategorie().key()));
  internetType.setInternetAddress(internet.getDetail());
  contactType.getInternet().add(internetType);

 }
}


Done!
No more If-Statements, no more InstanceOf and the code is now extandable and more flexible.

😱👇 PROMOTIONAL DISCOUNT: BOOKS AND IPODS PRO ðŸ˜±ðŸ‘‡

Be sure to read, it will change your life!
Show your work by Austin Kleonhttps://amzn.to/34NVmwx

This book is a must read - it will put you in another level! (Expert)
Agile Software Development, Principles, Patterns, and Practiceshttps://amzn.to/30WQSm2

Write cleaner code and stand out!
Clean Code - A Handbook of Agile Software Craftsmanship: https://amzn.to/33RvaSv

This book is very practical, straightforward and to the point! Worth every penny!
Kotlin for Android App Development (Developer's Library): https://amzn.to/33VZ6gp

Needless to say, these are top right?
Apple AirPods Pro: https://amzn.to/2GOICxy

😱👆 PROMOTIONAL DISCOUNT: BOOKS AND IPODS PRO ðŸ˜±ðŸ‘†

Sunday, February 26, 2012

When do we need DataTransferObjects - DTOs (indicators)

Indicators for DTOs (Data Transfer Objects)


DTO should be used with care. Generally we decide case by case, whether we shall introduce DTO layers which generates more complexity, or whether we work directly with the domain objects (DOs). The list below will assist us by our decission.


When can i use DomainObjects(DOs) direct to visualize details in the GUI?


Case 1: 
you can do it (and shall do it) by readonly views and if the domain object doesn't need to go back to the database. During this process the client may change values of the domain object if necessary. The only condition: The domain object is not returned to the database.


Case 2: 
If other software parts use the same service needing the whole content of a domain object. In this case you may get and use the whole domain object. But if you wanna change some values of it and store it back into the database, then you'll need new objects called: prefixDTOData. why that? Because otherwise we would force the service which writes the attributes into database to iterate over the whole domain object looking and comparing for changes before writing down in the database. 


When shall i better use DTOs? 


Case 1:
Use DTO's if the domain object is huge, but you just need a few attributes of it! For large domain objects, in which the client visualize, change or display only a few of its attributes. In this case we recommend to use the notation: prefixDTO. This is the object which the client uses to do its works. The service gets the Domain Object, creates the DTO and gives it back. If this DTO is used in a wizard or kind of formular in which the user may type something in setting values, which means that you have to store the typed information into database, then you should use in addtion to the DTOs new objects called: prefixDTOData. why that? Because otherwise we would force the service which writes the attributes into database to iterate over the whole domain object (remember that the domain object is huge) looking and comparing for changes before writing down in the database.


Case 2:
Use DTOs if the client has to show fields from different domain objects. In this special case you may consider putting all the needed attributes together already in the database creating the DTO in the server which is passed to the service going to the client. The client creates analoque to Case 1 a prefixDTOData an gives it back to the service. the reasons are the same as in explained in Case 1.


What are the disadvantages of DTOs?

You have/create additional complexities, which means that if things has to be changed, you have to make the changes everywhere in your code.


😱👇 PROMOTIONAL DISCOUNT: BOOKS AND IPODS PRO ðŸ˜±ðŸ‘‡

Be sure to read, it will change your life!
Show your work by Austin Kleonhttps://amzn.to/34NVmwx

This book is a must read - it will put you in another level! (Expert)
Agile Software Development, Principles, Patterns, and Practiceshttps://amzn.to/30WQSm2

Write cleaner code and stand out!
Clean Code - A Handbook of Agile Software Craftsmanship: https://amzn.to/33RvaSv

This book is very practical, straightforward and to the point! Worth every penny!
Kotlin for Android App Development (Developer's Library): https://amzn.to/33VZ6gp

Needless to say, these are top right?
Apple AirPods Pro: https://amzn.to/2GOICxy

😱👆 PROMOTIONAL DISCOUNT: BOOKS AND IPODS PRO ðŸ˜±ðŸ‘†

Friday, February 3, 2012

How to use the "Builder Pattern" in factories?

Using the "Builder Pattern" in Factories making your classes testable

Hi there! In this blog i want show to you how we can combine the builder pattern with the factory pattern making our classes testable. 

Common Problem

In many cases we have (must) separate Domain Objects (DOs) from the objects we use to visualize something in der GUI. For this reason we create in most of the cases Domain Transfer Objects (DTO's) which hold the values from the DO's in it. With a DTO Factory we would be able to create and fill up all attributes of it with default values. This is a good practise because this way we can use the factory to create DTO's also while testing it. That's when the builder pattern comes in. Combining the builder pattern with the factory pattern allow us to create default DTO's as well specific DTO's. Important: If you don't know when the usage of DTO's is appropriate, then you may read this post first: "When do we use DTO's"


UML of the example:


Example Address

Let's say we have the domain object (class) called Address that looks like this:

// Domain Object
public class Address {

    // only a few attributes to show the idea behind it
    private String street;
    private String land;

    public String getStreet() {
        return this.street;
    }

    public void setStreet(String street) {
        this.street = street;
    }

    public String getLand() {
        return this.land;
    }

    public void setLand(String land) {
        this.land = land;
    }

}

The DTO could look like this:

public class AddressDTO {

    private Address address;

    public AddressDTO() {
        this.address = new Address();
    }

    public Address getAddress() {
        return this.address;
    }

    public void setAddressDTO(Address address) {
        this.address = address;
    }
}


Then we would also need a mapper. It could look like this:

public class AddressMapper {

    Address domainAddress;
    AddressDTO addressDTO;

    public AddressMapper(Address domainAddress, AddressDTO addressDTO) {
        this.domainAddress = domainAddress;
        this.addressDTO = addressDTO;
    }

    public AddressDTO mapDomainToDto() {
        this.addressDTO.getAddress().setLand(this.domainAddress.getLand());
        this.addressDTO.getAddress().setStreet(this.domainAddress.getStreet());
        return this.addressDTO;
    }

    public Address mapDtoToDomain() {
        this.domainAddress.setLand(this.addressDTO.getAddress().getLand());
        this.domainAddress.setStreet(this.addressDTO.getAddress().getStreet());
        return this.domainAddress;
    }
}

The factory could be implemented like this:

public class AddressDTOFactory {

    private AddressDTO addressDTO;
    private boolean instanceObserver;
    private static AddressDTOFactory factory;

    // factory pattern knows how to create the DTO
    private AddressDTOFactory() {
        super();
        this.instanceObserver = true;
        this.addressDTO = create();
    }

    // singleton pattern instantiates the factory
    public static AddressDTOFactory getInstance() {
        return (factory == null) ? (factory = new AddressDTOFactory()) : factory;
    }

    // public mock values for testing purposes
    public static String DEFAULT_STREET = "MyStreet";
    public static String DEFAULT_LAND = "USA";

    // builder pattern can be used to mock tests
    public AddressDTOFactory street(String street) {
        createNewObjectIfNotObserved();
        this.addressDTO.getAddress().setStreet(street);
        return factory;
    }

    public AddressDTOFactory land(String land) {
        createNewObjectIfNotObserved();
        this.addressDTO.getAddress().setLand(land);
        return factory;
    }

    public AddressDTOFactory defaultFilling() {
        createNewObjectIfNotObserved();
        this.addressDTO.getAddress().setLand(DEFAULT_LAND);
        this.addressDTO.getAddress().setStreet(DEFAULT_STREET);
        return factory;
    }

    public AddressDTOFactory fillMandatoryFields() {
        createNewObjectIfNotObserved();
        // let's assume that land is a mandatory field in GUI and database
        this.addressDTO.getAddress().setLand(DEFAULT_LAND);
        return factory;
    }

    public AddressDTO getObject() {
        if (this.instanceObserver) {
            this.instanceObserver = false;
        } else {
            this.addressDTO = create();
        }
        return this.addressDTO;
    }

    // ensure right instance
    private void createNewObjectIfNotObserved() {
        if (!this.instanceObserver) {
            this.instanceObserver = true;
            this.addressDTO = create();
        }
    }

    private AddressDTO create() {
        return new AddressMapper(new Address(), new AddressDTO()).mapDomainToDto();
    }

}  


Now we have a testable AddressDTO with deterministic character that can be reused for several tests according to your needs. The test could look like this:

import junit.framework.Assert;
import org.junit.Before;
import org.junit.Test;

public class AddressDTOFactoryTest {

    AddressDTO defaultAddressDTO;
    AddressDTO mandatoryAddressDTO;
    AddressDTO emptyAddressDTO;
    AddressDTO customizedAddressDTO;
    AddressDTO totallyEmptyAddressDTO;

    public AddressDTOFactoryTest() {
        super();
    }

    @Before
    public void setUp() throws Exception {
        AddressDTOFactory factory = AddressDTOFactory.getInstance();
        this.defaultAddressDTO = factory.defaultFilling().getObject();
        this.mandatoryAddressDTO = factory.fillMandatoryFields().getObject();
        this.emptyAddressDTO = factory.getObject();
        this.customizedAddressDTO = factory.street("Av. Copacabana").land("Brazil").getObject();
        this.totallyEmptyAddressDTO = factory.getObject();
    }

    @Test
    public void testDefaultAddressDTO() {
        Assert.assertEquals(AddressDTOFactory.DEFAULT_LAND, this.defaultAddressDTO.getAddress().getLand());
        Assert.assertEquals(AddressDTOFactory.DEFAULT_STREET, this.defaultAddressDTO.getAddress().getStreet());
    }

    @Test
    public void testMandatoryAddressDTO() {
        String empty = null;
        Assert.assertEquals(AddressDTOFactory.DEFAULT_LAND, this.mandatoryAddressDTO.getAddress().getLand());
        Assert.assertEquals(empty, this.mandatoryAddressDTO.getAddress().getStreet());
    }

    @Test
    public void testEmptyAddressDTO() {
        String empty = null;
        Assert.assertEquals(empty, this.emptyAddressDTO.getAddress().getLand());
        Assert.assertEquals(empty, this.emptyAddressDTO.getAddress().getStreet());
    }

    @Test
    public void testCustomizedAddressDTO() {
        Assert.assertEquals("Brazil", this.customizedAddressDTO.getAddress().getLand());
        Assert.assertEquals("Av. Copacabana", this.customizedAddressDTO.getAddress().getStreet());
    }

    @Test
    public void testTotallyEmptyAddressDTO() {
        String empty = null;
        Assert.assertEquals(empty, this.totallyEmptyAddressDTO.getAddress().getLand());
        Assert.assertEquals(empty, this.totallyEmptyAddressDTO.getAddress().getStreet());
    }

}

Conclusion


A simple re-adjust or a little more class design can save you a lot of unnecessary, duplicated code and time. It makes the maintenance easier. Think always about how to test it while writing new classes. JUnit tests can be written faster and more consistent. This simple example is a very simplified class. In the real life an Address class is much bigger with a lot more attributes used inside. 


😱👇 PROMOTIONAL DISCOUNT: BOOKS AND IPODS PRO ðŸ˜±ðŸ‘‡

Be sure to read, it will change your life!
Show your work by Austin Kleonhttps://amzn.to/34NVmwx

This book is a must read - it will put you in another level! (Expert)
Agile Software Development, Principles, Patterns, and Practiceshttps://amzn.to/30WQSm2

Write cleaner code and stand out!
Clean Code - A Handbook of Agile Software Craftsmanship: https://amzn.to/33RvaSv

This book is very practical, straightforward and to the point! Worth every penny!
Kotlin for Android App Development (Developer's Library): https://amzn.to/33VZ6gp

Needless to say, these are top right?
Apple AirPods Pro: https://amzn.to/2GOICxy

😱👆 PROMOTIONAL DISCOUNT: BOOKS AND IPODS PRO ðŸ˜±ðŸ‘†

Friday, December 9, 2011

Whats your code style? isBigger contest!

Whats your code style? isBigger(...) contest!

Rules

Hi there! In this blog i want to see and learn from you. Post a), b), c) and so to show us how you code and why. Share your expirience with us. You may type/post your own solution if it isn't here. The goal of this post is to figure out the best code snippet to solve a specific, concrete problem as clean as you can and to share it with the world. 

The Task

Tell us how you would resolve spontaneously following current task:
how would you write a method that checks if one value is greater than the other? 

Solution A)

boolean isBigger( int a, int b){  boolean result=false;  if(a>b){   result=true; } return result; }

Solution B)


boolean isBigger( int a, int b){ 
 if(a>b){
  return true;
}
return false;
}

Solution C)


boolean isBigger( int a, int b){ 
 return a>b? true: false;
}

Solution D)


boolean isBigger( int a, int b){ 
 return a>b;
}

Solution E)


boolean isBigger( int a, int b){ 
 return Integer.valueOf(a).compareTo(Integer.valueOf(b)) <0;
}


Solution F)


interface compare<T>{
 boolean isBigger(T a, T b);
}


Solution G)


<T> boolean isBigger( T a, T b){ 
 return a > b;
}


Solution H)


boolean isLeftValueBiggerThanRightValue ( int leftValue, int rightValue){ 
  return leftValue > rightValue && leftValue != rightValue;
}


Solution I)


<T> boolean isBigger( T value1, T value2){ 
 final int equal = 0;
 return T.valueOf(value1).compareTo(T.valueOf(value2)) > equal;
}


😱👇 PROMOTIONAL DISCOUNT: BOOKS AND IPODS PRO ðŸ˜±ðŸ‘‡

Be sure to read, it will change your life!
Show your work by Austin Kleonhttps://amzn.to/34NVmwx

This book is a must read - it will put you in another level! (Expert)
Agile Software Development, Principles, Patterns, and Practiceshttps://amzn.to/30WQSm2

Write cleaner code and stand out!
Clean Code - A Handbook of Agile Software Craftsmanship: https://amzn.to/33RvaSv

This book is very practical, straightforward and to the point! Worth every penny!
Kotlin for Android App Development (Developer's Library): https://amzn.to/33VZ6gp

Needless to say, these are top right?
Apple AirPods Pro: https://amzn.to/2GOICxy

😱👆 PROMOTIONAL DISCOUNT: BOOKS AND IPODS PRO ðŸ˜±ðŸ‘†